

Tim Holtz Sizzix Halloween 2022 Release - Skulls Embossing Folder Card
- Keisha Diann

- Aug 10, 2022
- 3 min read

Hello Lovelies! This may look nothing like me, but as you saw in Tim Holt's August 6th YouTube LIVE for his Sizzix Halloween 2022 Release, the folder is spectacular!!! I'm definitely not the spookiest girl out there, but I do love a bit of naughtiness and highly recommend not taking yourself too seriously.
So I ended up falling for skulls who of course can be purchase individually but comes with the full release bundle with all the goodies available at Simon Says Stamp.

That's not the only bundle worth checking out, I'll be using the recently announced Tim Holtz Ranger Halloween release goodies in this card. check out the bundle below for all you will need and then some!

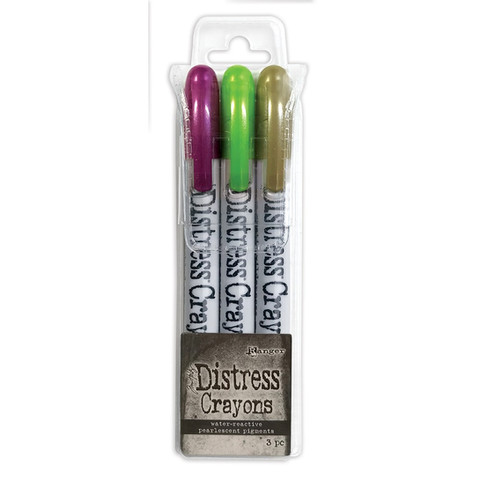
Today's card use these new seasonal colors of Distress Crayons as well as Mica Stains to to have some tongue in cheek fun!

One of the things that I love about this project is that you dont need that many things to pull it off, take a peek at the essentials below:
Essential Card Supplies:


Click here to view the full supply list or check it out the one linked in the gallery at the bottom of this post when you have finished exploring this card.
Today's GIF!
Think how surprised this guy would be if his skull had GOLD TEETH!
Like this card and my corny GIFs? CLICK BUTTON BELOW
to sign up for blog updates:
FEELING WICKED GOOD CARD
Card Base: 4 1/4" x 5 1/2"
Featuring:

CARD WALKTHROUGH
EMBOSSING
Place a 4 1/4" x 5 1/2" piece of Distress Watercolor Cardstock into the Skulls Embossing Folder and run through a die-cutting machine to emboss.
COLORING
Using the Distress Crayons, add color to the raised section of the skulls as shown in the following order:
Iron Gate
Burning Ember
Harvest Moon
Decayed
tIron Gatefinger to smudge the color into the paper. Note: Gloves are not necessary, but I had a white manicure that is prone to becoming stained...


Position embossed card front in Splat Box to prepare for spraying it.

Spray small sections of the card front with Decayed Distress Mica Stain:
top left
top right
just under the back of the orange skull
Just under the chin of the yellow skull
bottom left
CARD BACKGROUND

Place a sheet of Black Distress Halloween Woodgrain Cardstock into a Splat box and spray with Iron Gate and Burning Ember Distress Mica Stains.

Dry with a heat tool.

Dried background should look something similar to this.
SENTIMENT
Use the "Feeling Wicked" Halloween Bold Text die to diecut the sentiment out of the Black Woodgrain Cardstock.
Pop out the letters and set aside the letters temporarily.
Use low tack tape to momentarily adhere the negative die-cut to the Card Front.
Place glue on the die-cut letters and insert them into the corresponding open spaces so they align perfectly.


Apply Foam Tape to the back of the Card Front.
GOLD TEETH
Place a follow of Gilded Foundry Wax on your craft sheet.
Apply the wax onto the yellow skulls teeth using a small paint brush.
Clean brush with water and headset the wax with a heat tool.


I can't believe that I love this folder as much as I do, but look at the embossed detail covered in Distress Crayon and Mica Stain!

Foundry Wax for the win! Add a little rhinestone if you are feeling extra saucy!

Love the woodgrain pattern on the die-cut letters. The little snippet from the phrase "Focus on the Good" from the Label Stickers Thoughts Set completed the sentiment for me.

In my ridiculous imagination, these two skulls are good friends and are laughing about a shared memory :-)

Happy Halloween Lovelies!


Thank you so much for hanging out with me for this card; be sure to come back! Leave me a comment with your thoughts please. It means a lot and I am happy to take any questions.
See you soon!
SUPPLIES:
I listed the products that I have used below. Please note that these are compensated affiliate links used at no cost to you. I really appreciate your support. All stamps used today were part of my maker package from Tim Holtz and Stamper's Anonymous Click on the icons below each product picture to shop with Simon Says Stamp.


Kaiser OTC benefits provide members with discounts on over-the-counter medications, vitamins, and health essentials, promoting better health management and cost-effective wellness solutions.
Obituaries near me help you find recent death notices, providing information about funeral services, memorials, and tributes for loved ones in your area.
is traveluro legit? Many users have had mixed experiences with the platform, so it's important to read reviews and verify deals before booking.
A very cool and creepy card Keisha! Love the golden teeth. Thank you so much for sharing, stay safe and have a wonderful day.