

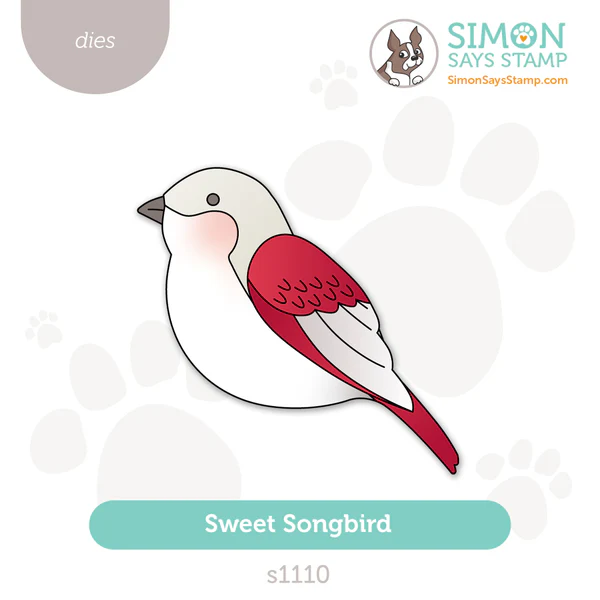
Tips For A Perfect Shaped Card - Featuring the SWEET SONGBIRD Set
- Keisha Diann

- Dec 4, 2025
- 2 min read

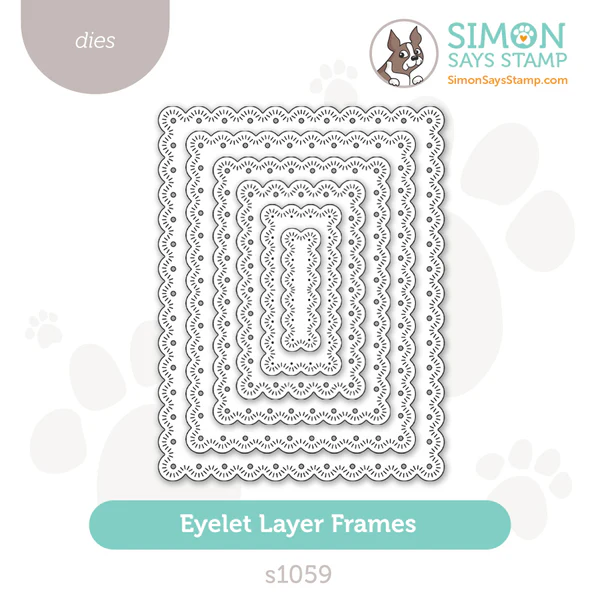
Hello Lovelies! It's not De-cember, but DieCember at Simon Says Stamp and I plan to have fun with these new crafting treat while focusing on die-cutting techniques and ideas. First up is the simple-shaped card using the Eyelet Layered Frames to create the card base and the Sweet Songbird as the focal point!
Let's get to the tips right away for making a perfect shaped card.
If die-cutting with a wafer die, avoid cardstock over 100lb weight; lighter 80lb cardstock even better.
Give your die-cutting "sandwich" an extra boost, consider adding a thin metal plate increase the pressure applied from the die to the paper.
Depending on your machine run the die and paper combo through more than once to ensure that die makes it through both layers of the paper.

Key Supplies for the Sweet Songbird Shaped Holiday Card
Click HERE for the full list!
Today's GIF!
I'm not even going to try to explain what is going on here...
Like this card and my CORNY GIFs? CLICK BUTTON BELOW
to sign up for blog updates:
SWEET SONGBIRD SHAPED CARD - Die-cutting, Inking, Stamping and Embossing
Card Size: ~4 1/2" x 5 1/2"

COLOR PALETTE
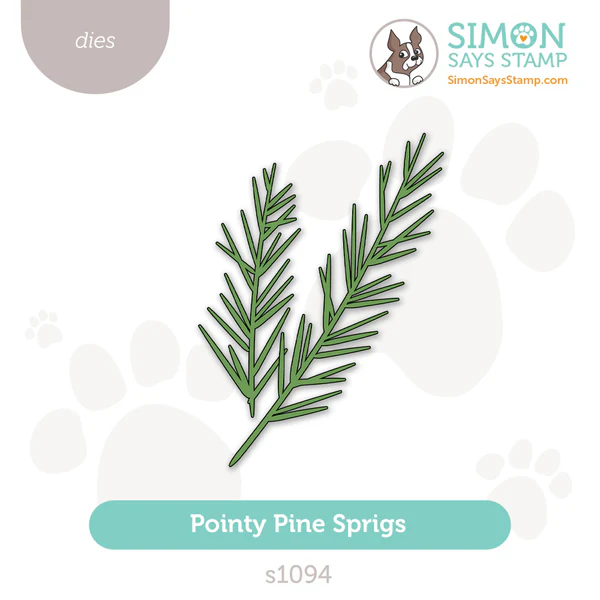
Simon Says Stamp 100lb Cardstock - Schoolhouse Red, Slate, Fog (+Sage for the card Base and Midnight Green for the Pointy Pine Sprigs)
Neenah Solar White 110lb Cardstock
Simon Says Stamp Pawsitively Saturated Ink Pad - Brick, Cranberry and Flannel (for inking the die-cuts)


CARD HIGHLIGHTS
Fold 5" x 11" Sage cardstock in half along the 11" side, secure the die as shown with the top cutting edge peeking above to top of the folded edge and die-cut.


Cut an additional Eyelet Frame from the same color cardstock (not folded) and layer this over the front flap of the cardbase to compensate for the top edge that is not fully cut out on the card base.
INKED DIE-CUTS

EMBOSSED SENTIMENT

ASSEMBLED LAYERS

UP CLOSE AND CRAFTY


LAST LOOK
Thanks for stopping by today! Drop me a comment and say hi!
SUPPLIES:
I listed the products that I have used below. Please note that these are compensated affiliate links, used at no cost to you. I really appreciate your support. All stamps used today were part of my DieCember maker package from Simon Says Stamp. Click on the icons below each product picture to shop with SimonSaysStamp.com.


Long hours of standing, travel, and continuous activity can gradually leave the body feeling heavier than expected. That may be why discussions around Foot Reflexology in Chennai are becoming more common among people looking for calmer wellness routines. Most experiences shared online describe it as a gentle and steady practice that supports relaxation without feeling overly intense. I’ve also noticed that wellness spaces like Le Bliss Spa are often appreciated for creating a quiet atmosphere that helps people disconnect from everyday stress for a while.
Creating time for self-care has become increasingly important in today’s demanding lifestyles. When people begin understanding what truly supports their physical and mental wellbeing, wellness becomes a more consistent part of life. In the same way, those who experience Thai Massage in Velachery often value its combination of guided movement and focused pressure techniques that encourage relaxation and overall body balance.
A lot of stress management advice focuses on individual habits, but shared relaxation can be just as important for couples. I’ve come across discussions where people mention trying a Couple Massage in Anna nagar as part of their routine. The idea seems to be less about occasional pampering and more about maintaining a steady rhythm of unwinding together. When both partners relax in the same setting, it often creates a sense of balance that carries into daily life.
Wellness-focused discussions like this help create more awareness around the value of consistent self-care and relaxation routines. Many individuals today are exploring healthier ways to manage work-related stress and physical fatigue. Similarly, Spa in Anna Nagar is often associated with peaceful wellness environments that allow people to slow down and recharge within their regular routines.
I’ve been seeing more discussions around AI Courses in Jaipur lately, especially from people trying to understand how AI tools are being used across different industries. It’s interesting to see how interest in this field continues to grow among learners and working professionals alike.