

Tim Holtz - Woodland Santa Card
- Keisha Diann

- Sep 29, 2021
- 3 min read

Hello Lovelies! I'm back to share details on my Woodland Santa card. I was so excited to get to play with the Santa from Tim Holtz and Sizzix's Christmas 2021 release.
Today we will take a closer look at this true-blue Santa, so you can put together your own festive winter scene.

Most of our scene building will focus on diecuts, but we'll need a couple of stamps as well.
Here are the dies and stamps that we will use in this project:


Feautured Supplies
An expanded supply list is available at the bottom of this post.
Let's get started with making a scene in the best way ever!
MERRY WINTER WISHES CARD - Direct-inking Cardstock with Distress Ink Pads, Die-cutting, Embossing and Scene-building
Card Base: 5" x 7"
Embossed Strip: ~1 1/2" x 5"
Featuring:
Tim Holtz Sizzix Snowflake 3D Impresslits Cut and Emboss Folder
Tim Holtz Sizzix Kaleidoscope 3D Texture Fades Embossing Folder
Tim Holtz Ranger Ink Distress Ink - Chipped Sapphire, Prize Ribbon, Blueprint Sketch, Speckled Egg, Iced Spruce, Peeled Paint, Rustic Wilderness, Brushed Corduroy, Antique Linen, Pumice Stone, Hickory Smoke, Black Soot

I've used my ink-pads to custom color cardstock recently for some of my 2021 Tim Holtz Sizzix Halloween and Christmas Projects. Inking gives the paper an almost velvety look and texture, which I think looks great when the diecut is assembled.
Neenah cardstock will give a smoother finish, Distress Heavystock gives a lush textured finish. Pick the one that appeals to you the most.

I added one additional non-Distress Ink color to get another shade of grey, Simon Says Stamp Slate Premium Dye Ink, to complete my vision for this scene. It took me a while to figure out Santa's colors, so I took a glamour shot of just those inks below. I forgot to include Chipped Sapphire and now I am in the Distress Ink Doghouse. LOL

PREPARING DIECUTS
I took process photos of the inked layers for this card alongside the ink colors specified below. Photos were taken at night and are showing up a little darker than normal, I tried to brighten them a bit, but hopefully you can see them ok.
(Mostly) Distress Mini Ink Colors (for coloring cardstock layers)
Mountain - Speckled Egg, Iced Spruce
Tree - Peeled Paint, Rustic Wilderness
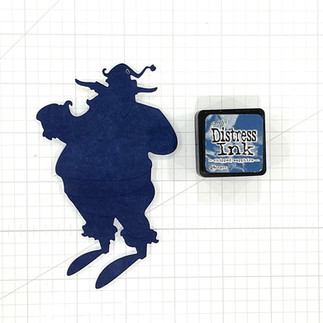
Santa's Sack - Pumice Stone, Slate
Santa's Shoes and Belt - Black Soot
Santa's Body - Chipped Sapphire, Prize Ribbon, Blueprint Sketch
Santa's Face - Brushed Corduroy, Antique Linen
Mountain Backdrop


Tree


Santa's Sack


Santa's Shoes and Belt


Santa's Body


Santa's Face


Santa Assembled


Finishing Card
Assemble all inked diecut layers using Bearly Craft Glue
Diecut remaining elements:
Buttons and Buckle - Silver Foil Cardstock
Merry - Blueprint Sketch, Silver Foil Cardstock (Layer blue on top of the silver diecut in a slightly offset fashion)
Snowflakes - White cardstock
Emboss a 1 1/2" x 5" strip of white cardstock using the Kaleidoscope folder
Stamp and trim a piece of white cardstock with "Winter Wishes" from the Modern Christmas set
Lay out assembled diecuts on the card base to get a sense of how you will place each element
Stamp the top of the 5" x 7" card base randomly with various Retro Snowflakes in Hickory Smoke inkSnowflakes so that they will show beneath the embossed snowflakes
Adhere the Kaleidoscope-embossed cardstock strip at the bottom of the card base
Adhere the mountain top background above it
Adhere Santa and the sentiments to finish


I promised details... so here you go...


Lovelies, Santa (minus beard) is looking suspiciously like a certain person in my home whose favorite color is blue... I am giving him this card for Christmas, but it will still be a surprise, because unlike you, he never reads my blog posts! LOL!!!
Thank you again for visiting! See you soon!
SUPPLIES:
I listed the products that I have used below. Please note that these are compensated affiliate links used at no cost to you. I really appreciate your support. All dies used today were part of my maker package from Tim Holtz and Sizzix. Click on the icons below each product picture to shop with SimonSaysStamp.com.


Kaiser OTC benefits provide members with discounts on over-the-counter medications, vitamins, and health essentials, promoting better health management and cost-effective wellness solutions.
Obituaries near me help you find recent death notices, providing information about funeral services, memorials, and tributes for loved ones in your area.
is traveluro legit? Many users have had mixed experiences with the platform, so it's important to read reviews and verify deals before booking.
Awesome card Keisha, I love, love that your Santa is in blue! The handsome guy that looks like this Santa without the beard must be a lucky guy to get this as his Christmas card. Thank you so much for sharing, stay safe and have a wonderful day.