

Tim Holtz Stampers Anonymous Release - Botanic Collage Card
- Keisha Diann

- Jun 11, 2022
- 3 min read

Hello Lovelies! So excited for new stamps and stencils from Tim Holtz's June 2022 Stampers Anonymous Release! We got 5 new stamp sets and 6 stencils. Simon Says Stamp is offering a bundle with all the goodies plus a free set of the latest mini ink cubes.

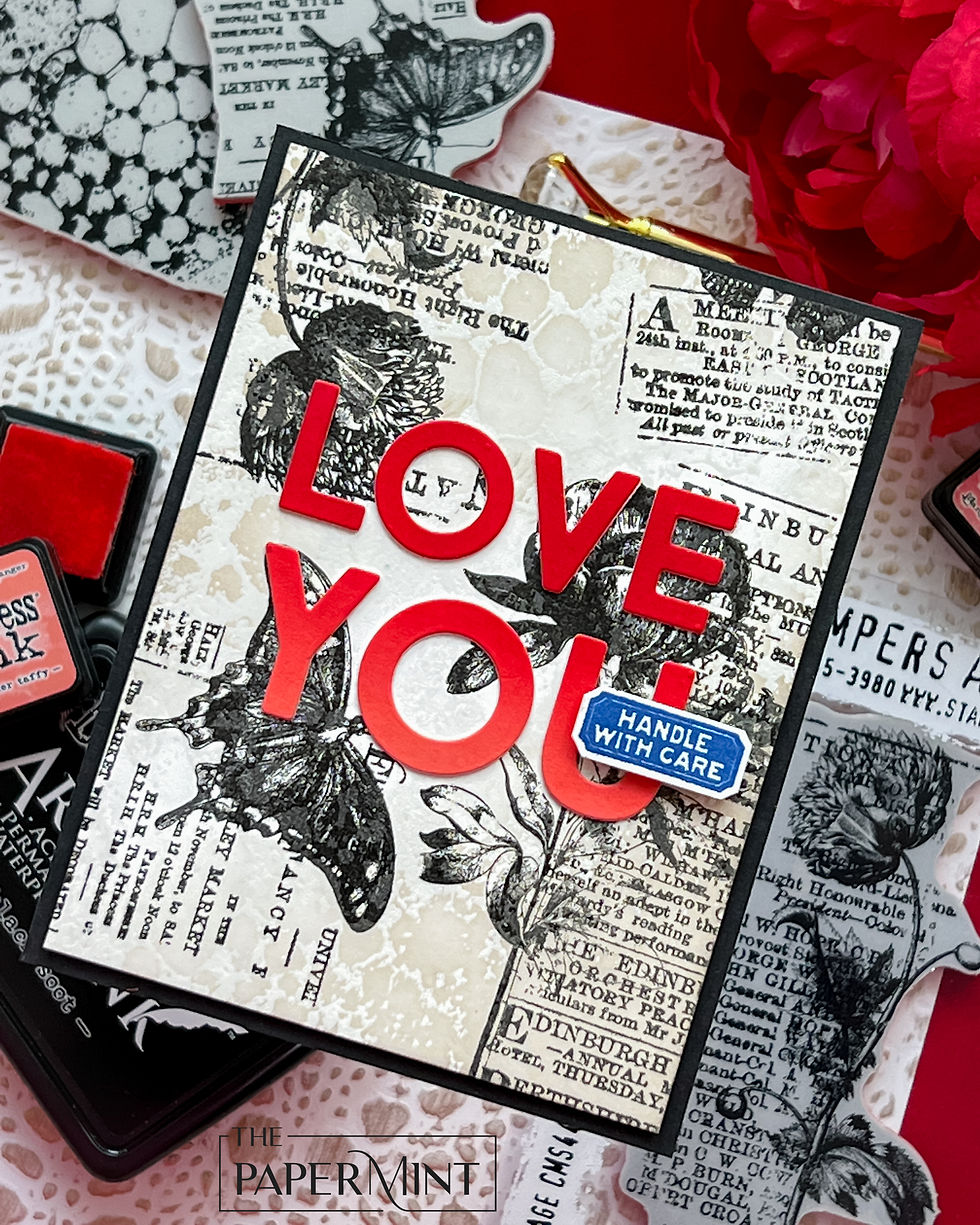
In today's card, I layered the Botanic Collage set with a wet embossed image of the Bubbles Stamp for some vintage vibes and added a bright blue inked label from the Eccentric set. An additional pop of color comes from the Sizzix Bold Text 1 sentiment. I decided use my Distress Archival Inks to get a really clean, clear impression.

Let's take a look at the key supplies that you will need for this simple card:
Essential Card Supplies:


Click here to view the full supply list or check it out the one linked in the gallery at the bottom of this post when you have finished exploring this card.
LOVE YOU CARD - Stamping, Embossing and Ink Blending
Card Base: 4 1/4" x 5 1/2"
Featuring:
Tim Holtz Ranger Distress Ink - Festive Berries, Saltwater Taffy, Pumice Stone
Tim Holtz Ranger Distress Archival Ink Pad MINI KIT 6 - Prize Ribbon
CARD WALKTHROUGH
STAMPING AND EMBOSSING

Stamp Botanic Collage images onto white cardstock using Distress Archival Black Soot.
Heat set the stamping to dry it completely with a Ranger Heat Tool.
Dust the stamped layer with powder using the Rabbit Hole Designs Powder Tool.

Position the Bubbles stamp over the dry Botanic Collage-stamped cardstock as shown.
Ink with Clear Ink and stamp on top of the stamped cardstock. Cover the clear ink with Ranger Clear Embossing Powder.

Melt the embossing powder with the Wagner Heat Tool.

Stamp the "Handle With Care" Image from the Eccentric Stamp Set in Distress Archival Ink Prize Ribbon.
Fussy-cut when complete.
INK-BLENDING

Gently and lightly ink over the stamped and embossed image using Distress Ink Pumice Stone, adding a bit more ink to the bottom right and top left of the panel..

Use a Ranger Mini Ink Blending Tool to ink blend Saltwater Taffy Distress Ink over 3/4 of ~2 3/4" x 4 1/4" piece of white cardstock.

Next add Festive Berries Distress Ink over the top half allowing the colors to "melt" into one another.
Die-cut this ink blended panel using the "Love You" Bold Text Die.
Die-cut another piece of white cardstock using the "Love You" Bold Text Die. Layer the inked letters on top of the white cardstock to give dimension.
ALIGNING DIE-CUTS

Position the negative (outline) layer of the Love You die-cut over the stamped/embossed/ink-blended layer as shown. I am using the Wendy Vecchi Make Art Staytion to hold the layers in place.

Adhere the Love You letters in the open spaces using Bearly Art Precision Craft Glue or your favorite wet adhesive.

Once complete, remove the negative layer,

Pop us the stamped base layer with foam tape.
Adhere fussy-cut, popped-up (with foam tape) Handle With Care image.
These vintage images are so beautifully detailed and I think that this further enhanced when layered with the embossed Bubble image and then inked.

I love the little surprise of the Handle Care label!

Contrast between the neutral, newspaper-like image with the bold red and blue layers makes the the flowers and butterfly even more of a gorgeous focal point!

Botanic Collage and Bubbles have so many possibilities, but I hope you like this simple approach!
Thank you for stopping by and see you soon!
SUPPLIES:
I listed the products that I have used below. Please note that these are compensated affiliate links used at no cost to you. I really appreciate your support. All stamps used today were part of my maker package from Tim Holtz and Stamper's Anonymous Click on the icons below each product picture to shop with Simon Says Stamp.


The Tim Holtz Botanic Collage Card release looks amazing! If you're into stamping and collage, you might find https://www.movavi.com/support/how-to/how-to-add-picture-to-video.html a helpful tool for enhancing your creations digitally. It's great for tweaking colors, adding text, or creating layered effects without complicating things. It’s not as complex as some other programs, so it's perfect for experimenting and bringing your designs to life. Give it a try!
Stunning Keisha, totally love this card. The simple black stamping, the subtle stenciling in the bakcground and than the pops of colour in red and blue! My kind of card. What a fabulous release, I have a lot of this release on my wish list and what a great Live Party with so much inspiration, loved it all. Thank you so much for sharing, stay safe and have a wonderful weekend.