

Tim Holtz Stamper's Anonymous Christmas 2020 Release
- Keisha Diann

- Oct 11, 2020
- 9 min read

Hi Lovelies!
It's beginning to look a lot like...at The PaperMint for Tim Holtz's Stamper's Anonymous Holiday 2020 release!
With 14 stamp sets and 4 stencils to choose from, it was hard to decide what to focus on for my first makes for this release.
After a bit of "sketching" (I am using that term very loosely LOL) and experimenting, I started with these 9 sets and have 7 projects for you today:


Products used are linked at the bottom of the post in the Supplies section. Please leave a comment and let me know what you think! :-)
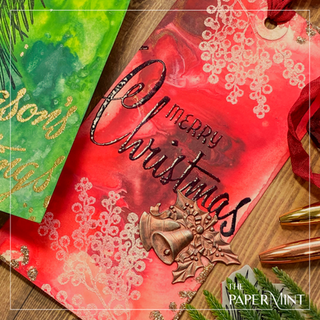
Project 1 - Forest Floor Tags
I don't know what possessed me, but I wanted to try making tags. Lately, I've been determined to step out of my card comfort zone and this is what happens when I do.
The lush Holiday botanicals from the Forest Floor stamp set paired sentiments from the Christmastime sentiment stamp set had me convinced it would work.

Traditional Christmas colors showcase the elegant image and sentiment stamps.

Featured Supplies:
Tim Holtz Stamper's Anonymous Forest Floor Stamp Set
Tim Holtz Stamper's Anonymous Christmastime Stamp Set
Tim Holtz Stamper's Anonymous Tiny Text Christmas Stamp Set
Distress Tags #8
Distress Paint - (Tag 1 -Tattered Rose, Candied Apple, Aged Mahogany), (Tag 2 - Bundled Sage, Twisted Citron, Mowed Lawn, Pine Needles)
Distress Archival Ink - Black Soot
Distress Ink Reinker - Mowed Lawn, Aged Mahogany
Tim Hotz Alloy - Mined
Distress Glitter Dust - Vintage Platinum
Tim Holtz Adornments Wreaths
Seam Binding Ribbon - Cream and Burgundy
Distress Sprayer
Distress Embossing Pen
Distress Collage Medium
Ranger Embossing Powder - Gold Tinsel, Clear,
Ranger Heat Tool
Key Techniques:
Paint Marbling Background
Smear streaks of Distress Paint on your craft mat.
Spritz the Paints with 4-6 quick sprays of water using the Distress Sprayer.
Press the entire tag into the paint and press down with the flat of your hand, twist the tag a little to get full coverage and mix the paint colors a bit.
Carefully lift up the tag and spray the "painted" side with about 2-3 spritzes of water to create a marbling effect. Place colored side up on your craft mat; gently dry with your heat tool.
Repeat process for the "back" of the tag.


Stamp and Emboss
Stamp/emboss the front of the tags with the "pine needles" and the "berries" images from the Forest Floor Stamp Set respectively. Stamp the back of the tag with the entire set of the Tiny Text Christmas stamp set in the Mowed Lawn and Festive Berries Distress Inks.
Emboss the sentiments from the Christmastime stamp set. Tip: "Merry Christmas" is stamped in Black Soot and embossed with clear embossing powder.
Use the Distress Embossing Pen to add a few dots of embossing ink around the top left edge and the bottom right edge of the "Season's Greetings" tag and heat emboss with the Gold Tinsel powder.


Embellish
Wet your seam binding ribbon with water and crumple in your hand to distress. while wet add 1 drop of the coordinating reindeer on 2 places of your crumpled ribbon. Set aside to dry.
Similarly, use the Distress Collage Medium to adhere little spots of Glitter Dust on the the "Merry Christmas" tag. Set aside to dry.
Color your wreath adornment with light and darker green alcohol ink markers. Color your adornment for the "Merry Christmas" tag with Rose Gold Alcohol Ink using a Q-tip.
Adhere your adornments to the tag with Distress Collage Medium and add your ribbon to complete your tag.


As


The Forest Floor images are so striking and have an immediate impact wherever they are stamped.


Project 2 - Peace on Earth Card
After the challenge of the tags, I wanted to slide right back into my comfort zone for a little while and do a project with a lower degree of difficulty for me. LOL My eyes immediately went to the Retro Flakes and Bold Tidings 3 stamp sets.

Peace on Earth - Featured Supplies
Tim Holtz Stamper's Anonymous Retro Flakes Stamp Set
Tim Holtz Stamper's Anonymous Bold Tidings 3 Stamp Set
Distress Ink Pad - Tumbled Glass, Salty Ocean and Chipped Sapphire
Distress Mica Flakes
Distress Collage Medium
Ranger Mini Ink Blending Tool
Ranger Embossing Powder - White
Ranger Heat Tool
Key Techniques:
Stamp and emboss Retro Snowflakes in white on white A2 cardstock.
Ink blend an ombre of blues on the cardstock to create the background.
Use Distress Collage Medium to adhere Mica Flakes to background.
Stamp and emboss "Peace on Earth" sentiment from Bold Tidings onto black cardstock and mount to background using foam tape.
Adhere background to A2 card base.


I love an easy card!

Project 3 - The Poinsettia Card
Every now and then a card turns out a bit better that I expected, and here I think The Poinsettia stamp set made it easy stand out with relatively minimal effort.

The Poinsettia - Featured Supplies
Tim Holtz Stamper's Anonymous The Poinsettia Stamp Set
Tim Holtz Stamper's Anonymous Vintage Holidays Stamp Set
Distress Watercolor Cardstock
Distress Sprayer
Mijello Mission Gold Watercolor Palette Set - 36 Colors
Ranger Embossing Powder - Silver
Ranger Heat Tool
Key Techniques:
Stamp and emboss the Poinsettia image in silver on Distress Watercolor Cardstock - A2 size.
Spritz Cobalt Blue and Greenish Yellow in your palette to wet the paint.
Select any petal and paint with water only to wet that area. Pick up a small amount of Cobalt Blue on a wet paintbrush and drop into the wet area and allow color to spread. Pull color into any areas that it does not spread to automatically.
Repeat until petals are all painted varying light and dark tones and then use Greenish Yellow to color the center of the poinsettia. Set aside to dry.
Stamp the poinsettia image on coordinating blue envelope using a watermark/embossing ink and heat set it. Stamp "A Merry Christmas" sentiment from the Vintage Holidays stamp set over the poinsettia as shown.
Cut dry watercolored card front down to 4" x 5.5".
Stamp "Christmas Greetings" sentiment in black from the The Poinsettia stamp onto card front.
Adhere card front to coordinating blue A2 card base using foam tape.


Of all the projects I did, this was the most relaxing and something about that blue was almost therapeutic for me.

Project 4 - Wishing You a Joyous Christmas Card
I love all kinds of coloring mediums and markers are no exception. I love my Distress Markers will miss them as they are retired, so I chose to use my Tombow Markers for both project 4 and 5 so that you can try this project too.

Wishing You a Joyous Christmas - Featured Supplies
Tim Holtz Stamper's Anonymous Winterscape Stamp Set
Tim Holtz Stamper's Anonymous Christmastime 3 Stamp Set
Distress Watercolor Cardstock
Distress Ink Pad - Shaded Lilac, Wilted Violet
Distress Sprayer
Tombow Dual Brush Pen Art Markers - 620, 553, 098, 925, 933, 856, 847, 992, 879, N35
Ranger Mini Ink Blending Tool
Ranger Perfect Pearls Pigment Powder - Perfect Pearl
Ranger Embossing Powder - Gold Tinsel
Ranger Heat Tool
Key Techniques:
Creating a Pearlescent Card Front and Coloring the Image
Add a pinch of the Perfect Pearl Powder to a Distress Sprayer that is 1/3 full of water, shake and then mist the A2 watercolor cardstock allowing larger droplets to randomly cover the paper. Set aside to dry.
Select the "birds on a branch" image from the Winterscape stamp set and align as desired on your MISTI or other stamp positioning tool.
Color the stamp itself as shown with the markers. Tip: I layer the color for this technique. I color the entire image in different colors, mist once with the Sprayer and stamp to see how everything looks and then go back and add details one color at a time to the rubber stamp and stamp again and again until I achieve a look that I am happy with.
Stamp the "dots/snowflake" image from the Winterscape stamp set along the top edge in Shaded Lilac Distress Ink and then color a few dots with Wilted Violet Distress Ink and stamp again.


Hopefully you can see some of the details a little more clearly below:

Adding Finishing Details
Cut the watercolored card front down to 3.75" x 5.5".
Lightly ink blend Shaded Lilac Distress Ink onto the top edge of the card front.
Deepen the ink blend using Wilted Violet Distress Ink in the top left and right corners.
Stamp and emboss the "Wishing You a Joyous Christmas" from the Christmastime 3 stamp set onto the card front.
Adhere card front to coordinating lilac A2 card base using foam tape.

Project 5 - Best Wishes Card
Project 5 uses the same the same technique or coloring the stamp with a water-based marker, but I used the Perfect Pearls Poweder in a different way this time.

Best Wishes - Featured Supplies
Tim Holtz Stamper's Anonymous Winterscape Stamp Set
Tim Holtz Stamper's Anonymous Christmastime 3 Stamp Set
Distress Watercolor Cardstock
Distress Ink Pad - Mowed Lawn, Peeled Paint
Distress Sprayer
Tombow Dual Brush Pen Art Markers - 177, 195, 173, 126, 992, 879
Ranger Mini Ink Blending Tool
Ranger Perfect Pearls Pigment Powder - Perfect Gold
Versamark Ink
Ranger Embossing Powder - Gold Tinsel
Ranger Heat Tool
Key Techniques:
Stamping and Coloring the Images
Select the "large tree" image from the Winterscape stamp set and align as desired on your MISTI or other stamp positioning tool.
Color the stamp itself as shown with the markers. Tip: I layer the color for this technique. I color the entire image in different colors, mist once with the Sprayer and stamp to see how everything looks and then go back and add details one color at a time to the rubber stamp and stamp again and again until I achieve a look that I am happy with.
Roughly mask the colored image with sticky notes and stamp the large tree again to the left and right of the colored image using Versamark Ink.
Dip a paint brush into the Perfect Pearl powder and dust the area where you stamped with the Versamark Ink using the powder to reveal the tree images in a gold sheen to the left and right of the colored tree.


The sheen is subtle but pretty!

Adding Finishing Details
Cut the watercolored card front down to 3.75" x 5.5".
Lightly ink blend Peeled Paint Distress Ink along the bottom edge of the card front.
Deepen the ink blend using Mowed Lawn Distress Ink on the bottom left and right corners.
Stamp and emboss the "Best Wishes for the New Year" from the Christmastime 3 stamp set onto the card front.
Adhere card front to coordinating green A2 card base using foam tape.

Project 6 - 'Tis the Season
I did 2 projects today with the Bold Tidings 1 set. The first is this card where I did a vibrant ombre on the stamp itself!

'Tis the Season - Featured Supplies
Tim Holtz Stamper's Anonymous Bold Tidings 1 Stamp Set
Tim Holtz Stamper's Anonymous The Poinsettia Stamp Set
Tim Holtz Stamper's Anonymous Poinsettia Stencil
Distress Ink Pads - Hickory Smoke, Twisted Citron, Spiced Marmalade, Candied Apple, Antique Linen, Pumice Stone
Ranger Mini Ink Blending Tool
Versamark Ink
Ranger Embossing Powder - Clear
Ranger Heat Tool
Key Techniques:
Stamp the "music score" image from the The Poinsettia stamp set repeatedly onto A2 white cardstock from the top to the bottom in Hickory Smoke Distress Ink to create a background.
Starting with the lighted color, Twisted Citron, ink the first 1/3 of the"Tis the Season" stamp while mounted to the "lid" of your stamping tool. Continue inking with the remaining colors Spiced Marmalade and Candied Apple.
Stamp the background and repeat the Inking if you want to deepen the color.
Leave the stamp in place on the lid and clean it.
Ink with Versamark and stamp, then heat emboss with clear embossing powder
Stencil the Poinsettia image in a mix of Antique Linen and Pumice Stone Distress Ink to overlap your sentiment.
Stamp the "dots" image from The Poinsettia set and stamp the bottom right and top left of the background in a mix of Antique Linen and Pumice Stone Distress Ink.
Mount to a red card base to finish.

Project 7 - Love + Peace +Joy Pencil Case
I bought a set of canvas pencil cases from Amazon to experiment with in the craft room. They can be used for craft supplies, make-up bags, cash-envelope pouches...however you prefer.

Here I used one of the stunning sentiments from the Bold Tidings 1 Stamp Set to make a cute bag for my small stencils.
Love + Peace + Joy - Featured Supplies
Tim Holtz Stamper's Anonymous Bold Tidings 1 Set
Distress Archival Ink Pad - Barn Door, Black Soot
Ranger Alcohol Ink - Poppyfield
Ranger Alcohol Ink Tools
Tim Holtz Idea-ology Baubles
Sticky Notes
Canvas Pencil Cases - set of 10 (linked below)
Key Techniques:
Stamping the Case
Secure a canvas pencil case to the stamping base of your MISTI or other stamp positioning tool with large bar magnets.
Select the "Love + Peace + Joy" stamp from the Bold Tidings 1 stamp set and align as desired on the "lid" of your MISTI or other stamp positioning tool.
Cover the "Peace + Joy" portion of the stamp with a sticky note.
Ink the "Love" portion of the stamp with Distress Archival Barn Door Ink and stamp the pencil case.
Repeat the inking and stamping process until the color of the inked word is as dark as you prefer.
Cover the "Love" portion of the stamp with a sticky note.
Ink the "Peace + Joy" portion of the stamp with Distress Archival Black Soot Ink and stamp the pencil case.
As before, repeat the inking and stamping process until the color of the inked word is as dark as you prefer.


Coloring the Bauble and Finishing
Pour a small amount of Poppyfield Alcohol Ink into a small container.
Select the small tool brush in the Alcohol Ink Tool Set and use it to apply the ink to the Bauble. It will dry quickly.
Attach the loop on the Bauble to the zipper-pull of the pencil case to finish!


Avoid coloring the loop and metal pieces on the top and bottom of the Bauble if you can, the contrast is nice to look at.

Easy-peasy! Now go and stuff it full of your favorite things!

I hope that you had fun here Lovelies!
Purchases from the Supplies section below help offset my blog maintenance fees and are super appreciated!
SUPPLIES:
I listed the products that I have used below. Please note that these are compensated affiliate links used at no cost to you. I really appreciate your support. All products were personally purchased, except the stamps and dies, which were received from Tim Holtz as part of my Maker package. I was not paid to do this post and love the products that I share. Click on the icons below each product picture to shop with Simon Says Stamp.


Your cards are breathtaking!!!!!!! I love the blue card the best but all are amazing. Thanks for sharing your techniques!!!! Just got signed up on Instagram and plan to follow all your makes
Thank you for the giveaway! I'm new to the stamping world and love your detailed instructions.
Your work is simply beautiful Elegant and unfussy. I love your work and your clear directions. So happy to have found you.
Thank you so much for the awesome tutorials and techniques! Love your creative talent 💕
Love your projects...so much inspiration! Thanks for the details on how everything comes together!