

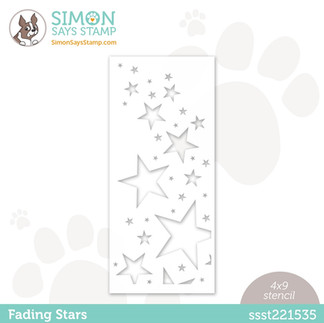
Simon Says Stamp - Rainbows Release Stencils
- Keisha Diann

- Jun 21, 2021
- 5 min read

This is not the first time that I have fallen down the stenciling rabbit hole, check out my 2020 STAMPtember blog post for the evidence!
I am always happy to see a stencil as they are easy, inexpensive and soooo versatile and Simon Says Stamp just released a new range of Slimline ones perfect for my lastest favorite card size.
In this post, we'll use use Distress Ink, Distress Sprays, Distress Texture Paste, Stickles, Glitter Gel and Deco Foil Transfer Gel Duo to make some fun Slimline cards!

I love how stencils do all the heavy lifting for you when making a card. I selected 5 of the 6 stencils from the Rainbows release for today's cards.


In addition to the above stencils, you will need:
Key Supplies
Distress White Heavystock
Distress Texture Paste
Distress Inks
Distress Oxides
Distress Sprays
DecoFoil Transfer Gel Duo
DecoFoil Watercolor - Lapis
Stickles Glitter Gel - Solar Flare, Moon Dust
Most of these cards require drying time, so I recommend starting other designs while some cards dry.

SENDING HAPPY THOUGHTS CARD - Pastel Distress Oxides over Texture Paste
Size: 3 1/2" x 8 1/2"
Featuring:
Distress Oxides - Kitsch Flamingo, Cracked Pistachio, Squeezed Lemonade
Additional supplies linked in the Supplies Gallery at the end of this post

I am starting with this card as it needs to be prepped and requires drying time before you can start working on them. I actually tackled this and and the base for the "Bigger Than the Ocean" card together as you will see below; use the Slimline Waves Stencil for the the Ocean card.
I've take a few photos as prompts for you in the event that you would like to make these cards.


The Texture Paste dries relatively quickly and the Transfer Gel Duo in about 1 hour. I left them both alone for about 90 minutes while I worked on other cards, so you can skip ahead now and come back to the rest of this card later.


All that is left is to embellish with the Butterfly Diecuts and the "Sending Happy Thoughts" Stamp from the XL Greetings 2 Set.


BIGGER THAN THE OCEAN CARD - Foiling a Stenciled Pattern
Size: 3 1/2" x 8 1/2"
Featuring:
Additional supplies linked in the Supplies Gallery at the end of this post
Be warned, if a perfectly stenciled image is important to you, it may be hard to achieve with a stencil as intricate as the Slimline Waves, but I like the rustic texture and the foil is so beautiful that even when I went outside the lines, I did not care.

I did the stenciling in the previous card so we will pick up with the application of the foil from here:


To apply the Foil Sheet to the stenciled background, you can use pressure (a die-cut machine) or heat (a laminator). Once done, peel off the sheet and clean up the background with a sharp tool if you have gel in spots that you don't want.


Embellish with (3rd smallest) heart diecut and sentiment from the Seas and Greetings Stamp Set.

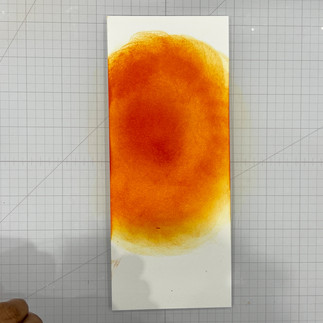
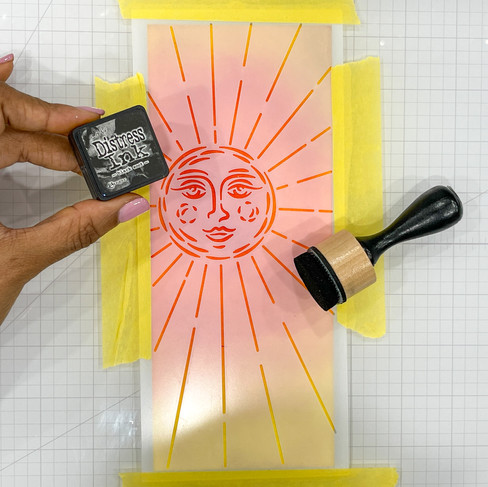
Endless Summers Card - Stickles Glitter Gel Stenciled Over Distress Ink Blending
Size: 3 1/2" x 8 1/2"
Featuring:
Distress Inks - Crackling Campfire, Spiced Marmalade, Mustard Seed
Additional supplies linked in the Supplies Gallery at the end of this post

The card base needs some Distress Ink blending before it is ready for stenciling. As a 1st step I marked lightly in pencil where the sun's "face" would be and then did some messy circular ink blending. Don't get too precious about it being smooth, the stencil will make it all look magical when done!

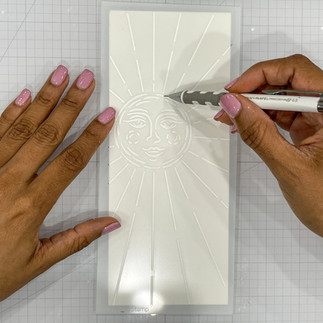


Next, I positioned the stencil over the card front and stenciled the Sunburst pattern in Black Soot Distress Ink, followed by the Solar Flare Stickles Glitter Gel. I then peeled back the stencil, set it aside to dry and clean my stencil. While it dries, I suggest skipping ahead to start the next card (or another project) and coming back to this one later.


This is my unexpected favorite card, but I will try this gel with a larger stencil that allows me to see the stars that are in this yummy mix. :-)

Once dry the card is ready for embellishing with a heat-embossed gold sentiment, "Wishing You Endless Summers..." from the Tropical Silhouettes Stamp Set and a gold Tim Holtz Metallic Droplet.

You Shine Card - Stickles Glitter Gel Stenciled Over Distress Sprays
Size: 3 1/2" x 8 1/2"
Featuring:
Distress Sprays - Seedless Preserves, Blueprint Sketch, Wilted Violet
Additional supplies linked in the Supplies Gallery at the end of this post

After setting up my Splat Box to limit the mess, I got started with generously spraying the card front and then setting it aside to dry:


Once dry, I was ready to stencil with the Moon Dust Stickles Glitter Gel, which I also set aside to dry :


Once dry, time to embellish with the You Shine diecut and the clear jewels.


So Happy For You Card - Two-toned Distress Ink Rainbow Stenciling
Size: 3 1/2" x 8 1/2"
Featuring:
Distress Inks -
Pastel Tones: Spun Sugar, Shaded Lilac, Cracked Pistachio, Shabby Shutters, Squeezed Lemonade, Dried Marigold
Bright Tones: Picked Raspberry, Wilted Violet, Peacock Feathers, Twisted Citron, Mustard Seed, Spiced Marmalade
Additional supplies linked in the Supplies Gallery at the end of this post

I did this card while I was waiting for a lot of the spray, gel and paste projects to dry. The Inks are sorted into two tones, Pastels and Brights. As you see below, I started with the Pastels (pics 1-3) and stenciled the entire rainbow of hearts.
(See pic 4+)I then worked my way from the bottom up, masking 1/2 of a selected heart with low tack tape and stenciling the left 1/2 of the heart with the corresponding Bright tone.


All that is left is the sentiment from the Tied the knot set and the rainbow of Brights Jewels.


How can you not love stencils?
Let me know in the comments which card is your favorite today.
Full supply list below for your shopping convenience.
See you soon Lovelies!
SUPPLIES:
I listed the products that I have used below. Please note that these are compensated affiliate links used at no cost to you. I really appreciate your support. Simon Says Stamps Card Kit products were provided as part of my Design Team package. Click on the icons below each product picture to shop with SimonSaysStamp.com.


Kaiser OTC benefits provide members with discounts on over-the-counter medications, vitamins, and health essentials, promoting better health management and cost-effective wellness solutions.
Obituaries near me help you find recent death notices, providing information about funeral services, memorials, and tributes for loved ones in your area.
is traveluro legit? Many users have had mixed experiences with the platform, so it's important to read reviews and verify deals before booking.
Awesome cards Keisha, I love stencils. My favorite card is the Happy Thoughts Card, so beautiful. Thank you so much for sharing, stay safe, enjoy your weekend!