

Simon Says Stamp - May 2022 Card Kit, Brushed Flowers
- Keisha Diann

- Apr 14, 2022
- 5 min read

Hello Lovelies! For me, Simon Says Stamp's Brushed Flowers Card Kit is showing me that big things can come in small packages! I have lots of love for ink cubes, so I am super tickled to get the juicy Pawsitively Saturated Inks in this new size AND the Simon Says Stamp Flannel Ink Cube Holder, so I no longer have to chase my cubes around desktop when blending.

Today's cards will focus on four techniques that showcase all this awesomeness!
Ink-blending
Embossed Resist Ink-blending
Ink Cube Color-Layering with Stamps
Ink Cube Pattern Making

Click image above to shop for the kit and full supply list.
In addition to the Ink Cube goodies, here's the full list of all the crafty goodies that the kit contains:
Exclusive! Simon Says Stamp Brushed Flowers 6 x 8 stamp set
Exclusive! Simon Says Stamp Flannel Ink Cube Holder (with zipper pouch)
Prima Painted Floral 6 x 6 paper pad
Simon Says Stamp Exclusive! Ink Cube Set - colors include Lucky, Rose, Ocean, and Citrine
Simon Says Stamp Clear embossing powder
Simon Says Stamp Small Teal blending brush
1 sheet Simon Says Stamp Black cardstock
1 sheet Simon Stamp Doll Pink cardstock
1 sheet Neenah 110 lb. Solar White cardstock
1 Simon Says Stamp A2 Metallic Doll Pink envelope
In addition to the inks, this set of four cards is all about these key items from the Kit:


These bright beauties are all easy, and I'll give you all the key details to try them on your own!

JUST A NOTE TO SAY HELLO - Ink-blended background
Patterned Paper Layer: 4 1/4" x 5 1/2"
Ink-blended Layer: 3 1/2" x 4 3/4"
Featuring:
IN KIT:
Exclusive! Simon Says Stamp Brushed Flowers 6 x 8 stamp set
Exclusive! Simon Says Stamp Flannel Ink Cube Holder (with zipper pouch)
Prima Painted Floral 6 x 6 paper
Simon Says Stamp Exclusive! Ink Cubes - Rose, Ocean, and Citrine
Simon Says Stamp Small Teal blending brush
1 sheet Neenah 110 lb. Solar White cardstock
ADDITIONAL:
Simon Says Stamp Premium Dye Ink Pad - Intense Black

Cut the Neenah Solar White Cardstock into 4 equal pieces measuring 4 1/4" x 5 1/2". Set aside the remaining 3 for the other cards.
Using the Small Simon Teal Blending Brush, blend Citrine ink 2/3 down the white cardstock, then blend Rose ink into 1/2 of the yellow ink to create a smooth transition to an orange color and then finish with only Rose ink at the bottom. (The size of the brush head of the small brushes is a great fit for the ink cube pads!)
The below photos will guide you through some key steps in making this card:


The four basic colors in the kit can give you a beautiful rainbow of colors. Love how the Citrine and Rose melt into each other!

The Simon Says Stamp Intense Black Ink is perfect for creating a striking pattern with the Brushed Flowers stamps.

Change up these colors to make more variations of this card if you like.

THANK YOU LOVE CARD - Embossed Resist, Ink-Blended background
Card Base: 4 1/4" x 5 1/2"
Embossed Layer: 3 1/4" x 4 1/2"
Featuring:
IN KIT:
Exclusive! Simon Says Stamp Brushed Flowers 6 x 8 Stamp Set
Exclusive! Simon Says Stamp Flannel Ink Cube Holder (with zipper pouch)
Prima Painted Floral 6 x 6 Paper
Simon Says Stamp Clear Embossing Powder
Simon Says Stamp Exclusive! Ink Cubes - Rose, Ocean, Lucky and Citrine
Simon Says Stamp Small Teal Blending Brush
1 sheet Neenah 110 lb. Solar White Cardstock
ADDITIONAL:
Simon Says Stamp Premium Dye Ink Pad - Intense Black
Simon Says Stamp Clear Ink Pad

For the ink-blended layer, stamp the florals in Clear Ink, dust with Clear Embossing Powder and heat set.


Ink blend all four inks clockwise over the clear embossing in the following order starting in the top left.


Stamp the card base and sentiment as show in Intense Black Ink.


Love all this gorgeous color that you get out of these four inks!
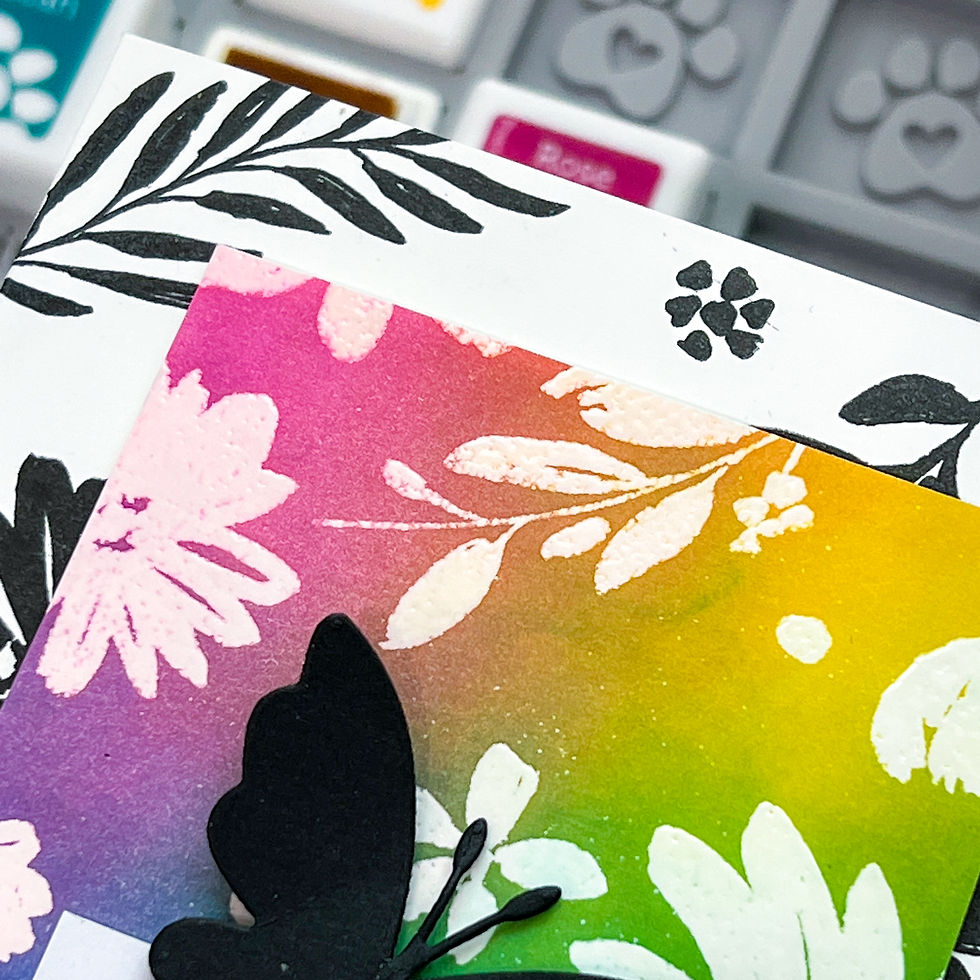
Note: Cut-apart is trimmed to 2 3/4" x 1 1/2". The butterfly die-cut is the from Simon Says Stamp Adeline Die.

The rainbow-blended panel is popped up to standout even more against the black-patterned layer.

YOU ARE SO SPECIAL TO ME CARD - Ink Cube Color-Layering with Stamps
Card Base: 4 1/4" x 5 1/2"
Stamped Layer: 3 7/8" x 5 1/8"
Featuring:
IN KIT:
Exclusive! Simon Says Stamp Brushed Flowers 6 x 8 Stamp Set
Exclusive! Simon Says Stamp Flannel Ink Cube Holder (with zipper pouch)
Prima Painted Floral 6 x 6 Paper
Simon Says Stamp Exclusive! Ink Cubes - Rose, Ocean, Lucky and Citrine
1 sheet Neenah 110 lb. Solar White Cardstock

No matter now many times I do it, I remain fascinated whenever I combine two ink-colors to create a third color. Here, after first stamping the ink in a base color, I added a second layer by taking advantage of the small size of the ink cubes to carefully ink the stamps in selected areas.
Green flower stems & leaves - layer 1 Citrine, partial layer 2 Lucky
Purple stems - layer 1 Ocean, layer 2 Rose
Blue flower - layer 1 Ocean, partial layer 2 Rose
Pink Flower - layer 1 Rose, partial layer 2 Citrine
A couple key photos from inking the flowers:


This one is my favorite! I love the pattern that the Citrine ink creates in the center of this flower.

Don't be too precious when inking the second layers, part of the fun is creating a unique pattern on the stamp using the edges of the ink cube.

This purple!!!

I also layered the color on the sentiment in Rose and Ocean to create this purple on the sentiment, before popping it up on another beautiful patterned paper from the Prima Paper pad.

SENDING HUGS CARD - Creating a Fringe Rainbow Pattern with Ink Cubes
Card Base: 4 1/4" x 5 1/2"
Fringe Pattern Layer: 3 3/4" x 5"
Featuring:
IN KIT:
Exclusive! Simon Says Stamp Flannel Ink Cube Holder (with zipper pouch)
Simon Says Stamp Exclusive! Ink Cubes - Rose, Ocean, Lucky and Citrine
Prima Painted Floral 6 x 6 Paper
1 sheet Neenah 110 lb. Solar White Cardstock
ADDITIONAL:
Simon Says Stamp Chunky A2 Scalloped Rectangles

This is the most fun of the four techniques for me. It is super quick, easy and almost impossible to mess up. The Ink cubes are directly stamped in an overlapping horizontal pattern across the white cardstock to create a rainbow pattern.
Tip: Don't press too hard on the pad when creating the pattern, a lighter touch will give a more partial imprint of the pad when is more interesting than a solid impression.
The pictures pretty much tell the story here, the butterflies are fussy cut from the Prima patterned paper.


I think that I am going to need to make more of these backgrounds!

Curl the fussy-cut butterfly wings upward to create a sense of movement on the card.

I think I have a butterfly obsession...

There are so many cards that you can make with this kit, but I hope you enjoyed the techniques I used to make this set. Many thanks for stopping by Lovelies. Do let me know in the comments if you had a favorite today.
Full supply list below for your shopping convenience.
See you soon Lovelies!
SUPPLIES:
I listed the products that I have used below. Please note that these are compensated affiliate links used at no cost to you. I really appreciate your support. Simon Says Stamps Card Kit products were provided as part of my Design Team package.
Click image below to shop for the Kit ONLY!
Click on the icons below each product picture to shop additional supplies with SimonSaysStamp.com.


Comments