PinkFresh Studio - Vellum Butterfly Cards
- Keisha Diann

- May 30, 2021
- 3 min read

I'm back with more butterflies and I think you can see why! This gorgeousness is from PinkFresh Studio's recent release and the delicate wings of the butterfly inspired me to work with vellum here.
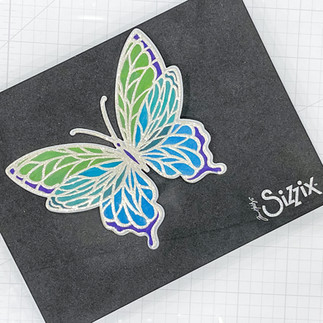
I also went right back to my Tim Holtz Shaping Kit to give these glittering butterflies some dimension, which really highlights them as the focal point of these cards.

Let's go through our some of the things you will need for embossing and coloring the vellum butterflies and then we will do a walkthrough of the cards!
Key Supplies
Zig Clean Color Real Brush Markers - Assorted (see below for selected colors)
A full supply list is available at the bottom of this post.
1. Give Yourself Time Card
I've got a big crush on PinkFresh Studio products, but who wouldn't with beautiful designs like this line art butterfly?

Initially, I intended color on the reverse of the vellum paper as I often do, but towards the end, I accidentally colored a section on the front and decided to transfer all of my coloring efforts to the front of the vellum.
I hope that you will find these cards straightforward, so I will focus on providing details on the embossing/coloring of each and a couple of other pointers to help you try this if you are interested.
Key Techniques
EMBOSSING
1. Trim vellum cardstock to 5" x 8". Use a loop of low-tack tape to adhere the vellum to the MISTI or other stamp positioning tool
2. Ink the PinkFresh Studio Butterfly Stamp in Simon Says Stamp Clear Ink and stamp onto the vellum
3. Using the "tape loop" as a handle, dust your ink in the Wow Metallic Platinum Sparkle Embossing Powder and heat emboss, being careful not to overheat the vellum
COLORING
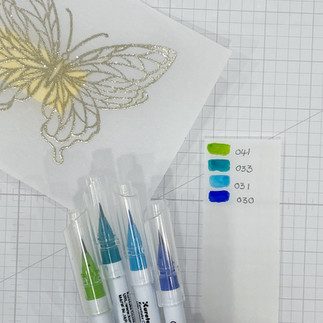
1. Select Zig Clean Color Real Brush Markers in the following colors - 041 Light Green, 033 Persian Green, 042 Turquoise Green, 030 Blue, 031 Cobalt Blue
2. Ink the PinkFresh Studio Butterfly Stamp in Simon Says Stamp Clear Ink and stamp onto the vellum
3. Color the front (embossed) side of the vellum butterfly as shown below:
SHAPING BUTTERFLY & FINISHING CARD
1. Adhere and wrap the PinkFresh Studio diecut over the front of the card base as shown in the 1st picture below.
2. Diecut the colored butterfly. I decided to color both butterflies at once and then die-cut after. Also diecut a second set of butterflies out of white cardstock
3. Using the Tim Holtz Shaping Kit, place the diecut butterfly onto the black foam platform. Use the ball-shaped tool to rub over the center of the butterfly as shown while pressing into the foam, the wings will begin to curl upward.
Continue rubbing the vellum around the center until you achieve the dimension that you prefer. Repeat with the white cardstock butterflies.
Other Key Notes:
The card is a non-standard size (4.25" x 4.25")
The card base is wrapped (front and back) in a PinkFresh Studio Slim Diagonal Stripes diecut (see 2nd pic, 1st row above)
"Give yourself time." sentiment - PinkFresh Studio Butterfly Stamp Set; stamped onto Simon Says Stamp Fog Grey Cardstock and popped up with foam tape
Jewels - PinkFresh Studio Jewels (Emerald City; Ocean Breeze; Sapphire)

2. Without Change Card
I adore bright colors, but I've continued to experiment with neutrals and I am falling in love!!
This next butterfly is in caramel and grey tones and I think I might have a favorite child. LOL!

Since the embossing is already done, we can jump directly to the coloring.
COLORING & FINISHING
1. Select Zig Clean Color Real Brush Markers in the following colors - 067 Mustard, 091 Light Grey, 094 Gray Brown, 092 Blue Gray, 096 Mid Grey
2. Color the front (embossed) side of the vellum butterfly as shown below:
Other Key Notes:
The card is a non-standard size (4.25" x 4.25")
The card base is stamped with PinkFresh Studio Miss Your Smile Stamp Set
"Without change, there would be no butterflies" sentiment - PinkFresh Studio Butterfly Stamp Set; stamped onto Simon Says Stamp Fog Grey Cardstock and popped up with foam tape
Crystals - PinkFresh Studio Jewels (not sure of the exact names, I used the brown and grey ones)


Thank you for stopping by. Let me know in the comments how you like to use vellum!
Full supply list below for your convenience.
See you soon Lovelies!
SUPPLIES:
I listed the products that I have used below. Please note that these are compensated affiliate links used at no cost to you. I really appreciate your support. Simon Says Stamp has funded the purchase of some of these products as part of my Design Team package. Click on the icons below each product picture to shop with SimonSaysStamp.com.















Awesome cards Keisha and the first thing I thought when I saw them on IG was: although I love bright colours my favorite is the one with the Without Change card. Now I see that you wrote something similar. Thank you so much for sharing these beauties, stays safe and have a wonderful week.