

Tim Holtz Stampers Anonymous FRENCH BOUQUET Card
- Keisha Diann

- Jul 30, 2024
- 3 min read

Hello Lovelies! What a busy summer it's been! So glad that I had a moment to make for the Tim Holtz and Stampers Anonymous Everyday 2 Release! I felt like we got a little bit of everything with flowers, collaged pieces, an alphabet and all occasion sentiments.
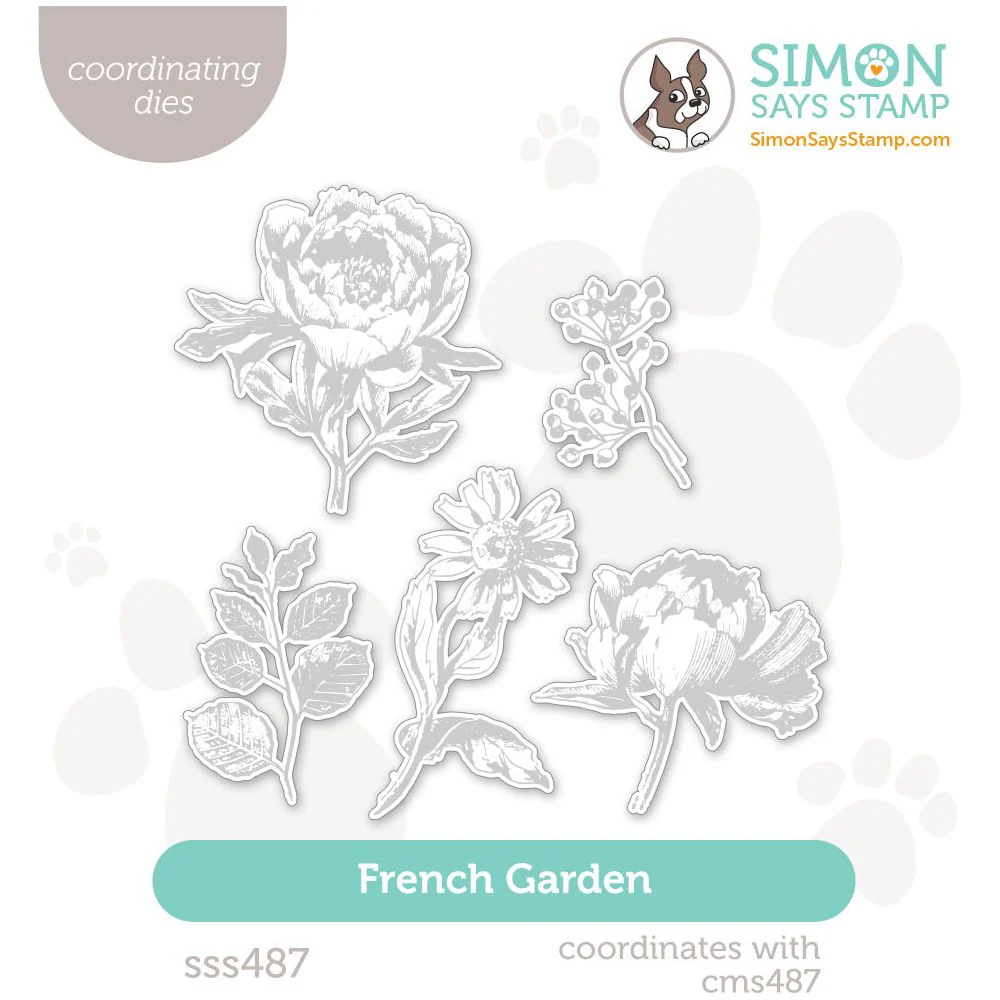
I'm playing favorites today though with this card featuring the French Garden Stamp set wiht the Tidbits set in the background to complement it and the simple, striking sentiment from the new Floristry set.

Let's take a closer look at both of these stamp sets. You can purchase them individually or get the whole bundle from Simon Says Stamp. Also, if you would like to add even more dimension to this card, you can consider the matching die set!
Tim Holtz|Stampers Anonymous FRENCH GARDEN Stamp Set

FRENCH GARDEN Die Sets by Simon Says Stamp

Tim Holtz|Stampers Anonymous TIDBITS Stamp Set

Tim Holtz|Stampers Anonymous FLORISTRY Stamp Set

Click here to view the full supply list or check out the one linked in the gallery at the bottom of this post when you have finished exploring this project.
Today's GIF!
Yes, I'm a sucker for flowers too!
Like this card and my corny GIFs? CLICK BUTTON BELOW
to sign up for blog updates:
JUST BECAUSE CARD CARDS - Ink Blending, Embossing, Crackle Paste Stenciling
Card Size: 4 1/4" x 5 1/2"

PROJECT PALETTE
Tim Holtz Distress Ink - Uncharted Mariner, Weathered Wood, Milled Lavender, Saltwater Taffy, Worn Lipstick

Lately, I've been using Sarah Renee Clark's Color Cube to help me select color palettes and used one for almost every card I made for this release. Check out my inspiration below.

PROJECT WALKTHROUGH
STAMPING
Use a piece of painter's tape to attach a 4" x 5 1/4" piece of white cardstock to a large acrylic block
Leaving the Tidbits Stamp set in place on it's plastic mount, use the selected Distress Ink Cubes to create horizontal stripes of each color across the entire stamp
Once the inking is complete, mist with 2-3 spritzes of water
Use the acrylic block to press the attached white cardstock into the inked stamp, applying even pressure and holding in place for about 30 - 40 seconds to get a good impression


INK-BLENDING
Once dry, using a Mini Blending Tool or Blending Brush, apply the corresponding Distress Inks over the stamped image in the same order as the stamping


ARCHIVAL INK STAMPING & EMBOSSING
Use the selected script handwriting and labels from the French Garden Stamp Set inked with Black Soot Archival Ink to stamp the card front
Dust the card front with an Anti-static tool
Ink and stamp the flower also using Black Soot Archival Ink
Leaving the stamp in place, ink and stamp the flower using Distress Embossing Ink or Clear Ink
Sprinkle clear embosing powder over the flower and heat set with a heat tool


STENCILING
Apply Opaque Distress Crackle Paste using a palette knife through the Damask Crest Stencil on the top left and bottom right of the card front
Set aside to dry

FINISHING
Use a Tiny Blending Tool to deepen the color within the flower petals
Use a wet paintbrush to outline the flower shape creating a bleached halo effect around the flower
I think I'm falling in love with Uncharted Mariner all over again!
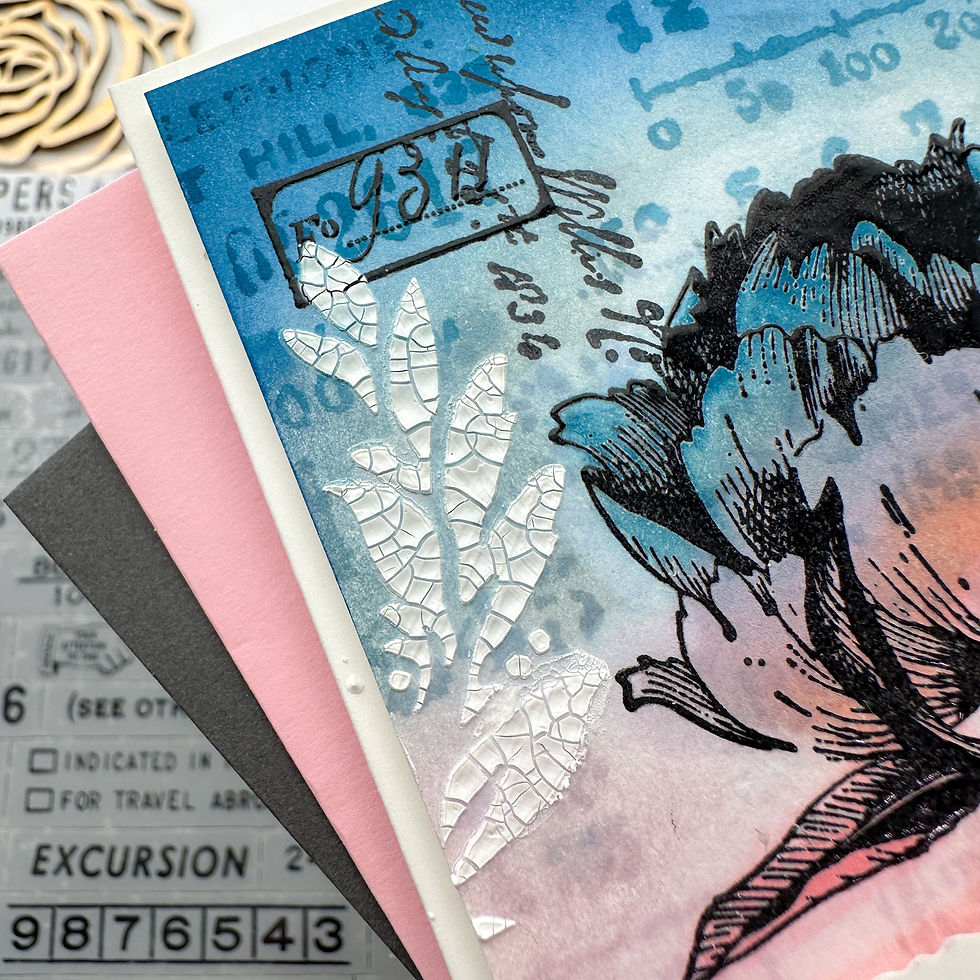
The detailed hatching on that flower is gorge!!

A little bit of Crackle Paste goes a long way!

All done and all pretty!

Thank you for stopping by and I hope this was helpful. Leave me a comment with your thoughts please. It really does make my day and I am always happy to take any questions.
See you soon!
SUPPLIES:
I listed the products that I have used below. Please note that these are compensated affiliate links used at no cost to you. I really appreciate your support. All new release Stamps and stencils used today were part of my maker package from Tim Holtz and Stampers Anonymous.


Comments