

Tim Holtz Sizzix Holiday 2022 Release - Layered Plaid Card
- Keisha Diann

- Oct 3, 2022
- 3 min read

Hello Lovelies! The Layered Plaid Thinlits from the Tim Holtz Sizzix Holiday Release is GENIUS, two passes through a die-cutting machine gives you an intricate and realistic plaid that you can color any way you want! So naturally, I went rainbow!
Today we will use Reinkers to create a warm and cool color gradient that will be diecut and stacked one on top of the other! We will use 3 die sets from the new release that you can purchase individually or as a bundle available at Simon Says Stamp.

Today's main event is this little die set!

Click here to view the full supply list or check out the one linked in the gallery at the bottom of this post when you have finished exploring this card.
Today's GIF!
Don't stare at this too long,
or you may get hypnotized by the
RAINBOW PLAID!
Like this card and my corny GIFs? CLICK BUTTON BELOW
to sign up for blog updates:
RAINBOW PLAID CARD - Rainbow Gradient Inking, Die-cutting and Layering
Card Base: 4 1/4" x 5 1/2"
Featuring:
Tim Holtz Distress Reinkers - Picked Raspberry, Wild Honey, Twisted Citron, Tumbled Glass

CARD PALETTE
Distress Ink Colors: Picked Raspberry, Wild Honey, Twisted Citron, Tumbled Glass

Note: You will need to work on a glass craft mat or crafting sheet as the ink is applied directly to the mat/sheet.

Spritz craft mat generously with water.
CARD WALKTHROUGH
INKING
Add a few drops of ink to the section of the mat with the water, I used about 3 drops of Picked Raspberry at the top and 6 drops of Wild Honey at the bottom
Mix the ink and water together (fingers are fine, but I used a paintbrush :-) )
Press the watercolor cardstock into and watery ink, twist slightly and lift up, the cardstock should be fully inked
Repeat for the remains colors


Inked Cardstock:

Ink white cardstock by applying the ink pad directly to the paper and then die-cut.

DIE-CUTTING
Use the chunkier die on the cool gradient (green/blue), the thinner die on the warm gradient (yellow/pink)
Diecut the frame out of kraft cardstock


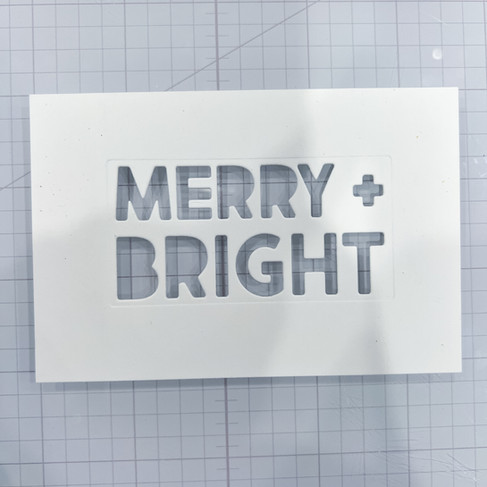
Diecut white cardstock with the Merry + Bright die 3 times. Hold onto one of the negative die-cuts for use when placing the letters.


LAYERING
Adhere the warm gradient plaid die-cut on top of the cool gradient plaid die-cut using a wet glue
Adhere the layered plaid to a piece of acetate cut to size, using 1/8" and 1/4" double-sided tape for a strong hold


Adhere 1/8" foam tape to the plaid to create 3 sections to place the sequins and elevation to store them between the acetate and paper layers.

Place a mix of clear and a few white sequins in each section and them remove the foam tape backing.

Cover the shaker "container" with the Kraft diecut
Adhere 1/2" wide double sided tape to the back side of the Kraft cardstock
Adhere the covered shaker container to a white card base

Tip: You can leave the excess kraft cardstock or leave it as a contrasting border. I decided to get rid of it.

LAYERED SENTIMENT
Adhere the three corresponding layers of the sentiment to each other to create the raised lettering for the sentiment
Temporarily adhere the negative die-cut on the card front with low tack tape and use it to align the letter as you adhere it to the plaid with wet glue


Adhere the layers of the bow together
Add wet glue to the top and little bits of foam to the bottom


After adhering the bow as shown you are done!

Rainbow layers help make this card very MERRY!

With the busy plaid above, the sequins are subtle but fun touch in this shaker!

This is definitely a happy card!

You are guaranteed to be delighted if you give this a whirl!

Thank you so much for stopping by, be sure to come back! Leave me a comment with your thoughts please. It means a lot and I am happy to take any questions.
See you soon!
SUPPLIES:
I listed the products that I have used below. Please note that these are compensated affiliate links used at no cost to you. I really appreciate your support. All stamps used today were part of my maker package from Tim Holtz and Sizzix Click on the icons below each product picture to shop with Simon Says Stamp.


Too cute! I’m going to try to make this as well! Where is that little bow from exactly?
I really like how you made 3 compartments for the shakeity bits to shake around. That way there is always something in the areas.