

Tim Holtz - Sizzix Chapter 3 Launch
- Keisha Diann

- Jul 10, 2021
- 5 min read

Hello Lovelies! It's about the 1-year anniversary since Tim Holtz invited me to do makes for some of his brands and I'm thrilled to feel like I have grown along the way and delighted to share these designs with you.

As Makers, we are able to choose the dies that we would prefer to work with and I immediately went for these 5, all available now for purchase at Simon Says Stamp:


Feautured Supplies
A full supply list is available at the bottom of this post.
Today's cards feature no stamping, but focus on creating eye-catching backgrounds with simple ink-blending, alcohol-inking and watercoloring techniques that showcase these gorgeous dies! I'll share a few tips and photos on each if you are interested in giving this a try.
THINKING OF MONDRIAN CARD - Direct-inking Cardstock with Mini Ink Pads and Simple Die-cutting
Size: 4 1/4" x 5 1/2"
Featuring:
Distress Mini Inks - Barn Door, Blueprint Sketch, Squeezed Lemonade, Hickory Smoke
Simon Says Stamp 100# Black Cardstock
Additional supplies linked in the Supplies Gallery at the end of this post
Artwork is supposed to leave an impression on you, whether you like it or don't get it. I didn't understand Mondrian's work when I first saw it, but it stuck in my brain and was memorable. Maybe one day I'll get to see it in person but today it's inspiring this card.

Key Techniques:
Make diecuts with Varsity Alphabet and Rectangle dies using Distress Heavystock
Layout rectangles on a scrap piece of A2 (4 1/4" x 5 1/2") paper in a pattern that you find pleasing. Some of the rectangles will need trimming to fit the final design
Ink select rectangles by applying the Mini Distress Ink Pads to the rectangle diecuts, dragging the ink pad across the diecut until you achieve even color. Use the following colors: Barn Door, Blueprint Sketch, Squeezed Lemonade and Hickory Smoke
Arrange and adhere the rectangles on an A2-sized piece of Simon Says Stamp 100lb Black Cardtock, leaving even borders between each
Trim excess and embellish card with diecut letters and stickers and adhere to an A2 card base


It's super simple and but if you get Mondrian, you'll love it!

GO WITH YOUR HEART CARD - Silhouette Diecut over Alcohol-Inked Background
Size: 4 1/4" x 5 1/2"
Featuring:
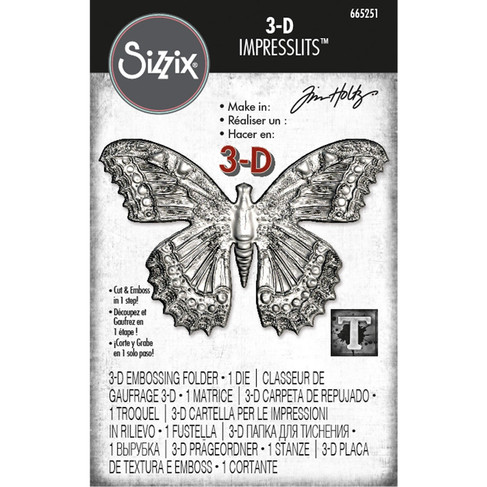
Tim Holtz Sizzix Butterfly 3D Impresslits Cut and Emboss Folder
Tim Holtz Alcohol Inks - Valencia, Dandelion, Mojito, Clover, Silver Metallic Mixative
Rubbing Alcohol
Additional supplies linked in the Supplies Gallery at the end of this post

I actually made this background a while back as I do my alcohol ink panels in batches. I set aside an entire morning or afternoon and do nothing else but experiment with colors and techniques. I feel that I get a hang of how to control the movement of the ink the more I do it.
Though I won't do a tutorial on Alcohol inking techniques here today, I will say that this panel involves a lot of Alcohol Ink Blending Solution and Rubbing Alcohol. Also, I did a post recently on working with Alcohol Ink which you mind find interesting and I've linked it here if you want to take a peek.

Key Techniques:
Create the Alcohol Ink background using Distress Heavyweight Yupo and Tim Holtz Alcohol Inks in the following colors: Valencia, Dandelion, Mojito, Clover, Silver Metallic Mixative
Trim the panel to 4 1/4" x 5 1/2"
Diecut the Simon Says Stamp Black Cardstock twice using the Leafy Twigs Thinlits Die
Use the fine tip of the Bearly Art Precision Craft Glue to apply glue to the reverse side of the Leafy diecut and first adhere the two diecuts together. Then adhere the layered diecuts to the alcohol ink panel
Diecut the Simon Says Stamp Vellum Cardstock using the Butterfly 3D Impresslits Cut and Emboss Folder
Shape the vellum butterfly using the Shaping Tool and foam pad, so the wings pop up
Assemble card as shown with butterfly, metallic droplets and metallic quotations stickers


The Tim Holtz Idea-ology Quotations Metallic Stickers have some many options, you can make a completely different message than what I have selected here!


I can't get over these little pretty details that you can make with these dies!


Fully assembled:

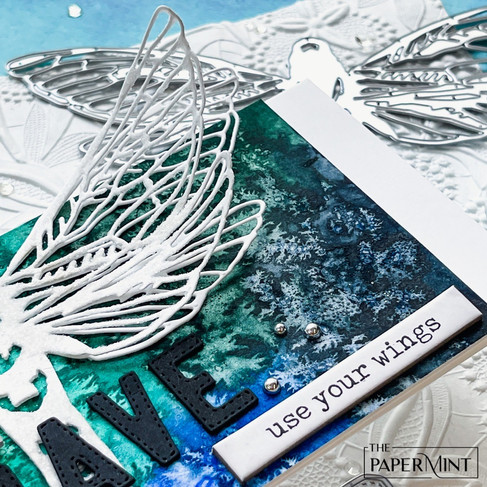
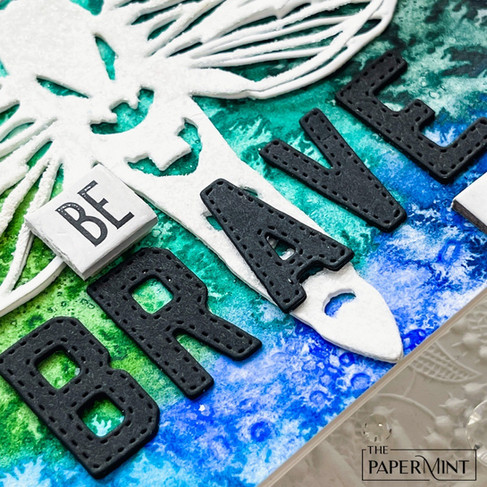
USE YOUR WINGS CARD - Glittered Diecut on Watercolor Salt-Effect Background
Size: 3 1/2" x 8 1/2"
Featuring:
Sea Salt (large crystals preferred)
Additional supplies linked in the Supplies Gallery at the end of this post

Key Techniques:
This background with traditional watercolors, but it would be interesting to see what would happen with Distress Ink. Here are the Key Steps: a) trim Distress Watercolor Cardstock to 5" x 7", b) generously spritz cardstock and watercolor palette with water, c) drop select watercolors (I used Cobalt Blue #1, Ultramarine Deep, Indigo, Van Dyke Green, Viridian, Hooker's Green and Sap Green) and into onto the wet cardstock adjacent to each other and let them run together, d) once the cardstock is covered with color and while still very wet, drop salt into the watercolors and set aside to dry e) the salt will form "blooms" in the color as it dries, scrape off the dried salt once the entire panel is no longer wet
Trim the watercolor panel to 3 1/2" x 7". Reserve the excess for another project
Diecut the Simon Says Stamp Heavystock twice using the Perspective Moth Thinlits Die
Cover one of the Moth diecuts in Multi Medium Matte. This will make the wings curl up a bit towards the body and that is fine :-)
Dust the diecut in Clear Rock Candy Distress Glitter and set aside to dry
Once dry, layer the diecuts and the card panels as shown on a folded slimline card base
Diecut the word "BRAVE" out of Simon Says Stamp Black Cardstock (twice per letter) using the Alphanumeric Varsity Thinlits Dies. Layer and adhere the letters
Embellish the card base with the diecut word, Quote Chips and Metallic Droplets


Look at those wings!


I am totally in love with the Varsity Alphabet, it cuts so cleanly and I can get 3 styles of letters out of one Alphabet! I have not chosen to use the outline part of each letter for this project but can't wait to try it out on another project.


All done!

Lovelies, I hope you enjoyed the cards today.

Please tell me which one was your personal favorite.
See you soon!
SUPPLIES:
I listed the products that I have used below. Please note that these are compensated affiliate links used at no cost to you. I really appreciate your support. All dies used today were part of my maker package from Tim Holtz and Sizzix. Click on the icons below each product picture to shop with SimonSaysStamp.com.


ohmygosh, you made the new products just SING! Thank you for terrific tutorials and new inspiration!
I don't understand Mondrian but I love your rectangle card!
Stunning cards Keisha, I love them all three. Everyone has something speciaI, so awesome. I don't understand Mondriaan either LOL but I like his art, probably because of the bright colors. I loved todays TH Live with all the awesome new products from Chapter 3. Thank you so much for your stunning inspiration, stay safe and have a wonderful weekend. PS. I didn't make a typo or perhaps you knew this already, the Dutch painter Mondriaan is better known abroad as Mondrian, a change he introduced himself after he moved to Paris, probably because it was easier to pronounce.