Simon Says Stamp - Leaves Wreath Trio, STAMPtember 2021
- Keisha Diann

- Sep 19, 2021
- 3 min read

I adore Stencils and have a major crush on the stencils that I've been seeing lately that come in layers like the Leaves Wreath from Simon Says Stamp, STAMPtember 2021 Release!
The large leaves on this stencil fill up a card quickly and the bright colors are eye-catching and joyous!
I made this trio of simple cards by pairing that 6" x 6" stencil with leaf and sentiment diecuts pictured below:
If you don't yet have blending brushes, I would recommend the smaller size of Simon Says Stamp Blending Brushes . They come in both large and small sizes and I like the small size for stenciling.
The cards rely on super easy ink-blending and stencil-layering to get the striking gradients and details showcased in each card.
Let's Get to Making!
SCRIPT THANKFUL CARD - Stenciled Leaves and Layered Diecut Sentiment
Card Base Size: 6" x 5.5"
Brown Card Front Mat: 5 5/8" x 5"
Card Front Mat: 5 1/2" x 4 7/8"
Featuring:
Simon Says Stamp Leaf Wreath Stencil
Simon Says Stamp Thankful for You Dies
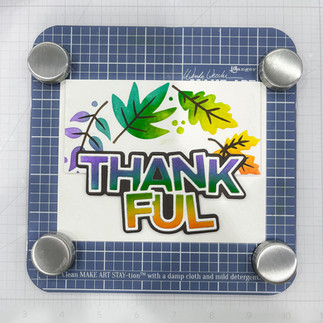
Wendy Vecchi Make Art Station
Tim Holtz Distress Ink Colors: Rusty Hinge, Mustard Seed, Lucky Clover and Wilted Violet

Before we get started, 2 things!
I have fallen in love with the Wendy Vecchi Make Art Station. This simple tool is a metallic mat with AMAZINGLY STRONG magnets to hold your surfaces and tools in place and it is a godsend when stenciling
I know that it seems like I used an entire rainbow of colors but my trusty Distress Ink colors blend so seamlessly and create beautiful gradients as the colors react with one another to create new shades.

Key Tips:
The cardstock is initially cut to 6" x 6" and then trimmed after stenciling
The Distress Ink colors are applied in the following order starting top center and going clockwise until you end up where you started: wilted violet, lucky clover, mustard seed, rusty hinge, wilted violet, lucky clover, mustard seed, rusty hinge
With the first layer complete, remove the "leaf outline" stencil layer and align the "leaf veins" layer and color with the Walnut Stain Distress Ink
Repeat all of the above to make a 2nd stenciled panel for the 2nd and 3rd cards
Once stenciling is complete, cut down the card front to 5 1/2" x 4 7/8", layer on top of the brown cardstock and pop up on top of the Smoke Grey card base
Finish with layering your Thankful diecut using brown and metallic gold cardstock.

All done and all pretty!

LARGE THANKFUL CARD - Ink-blended Diecut, Matching Stenciled Leaves and Jewels
Card Base Size: 4 1/4" x 5.5"
Brown Card Front Mat: 5 5/8" x 5"
Card Front Mat: 5 1/2" x 4 7/8"
Featuring:
Simon Says Stamp Leaf Wreath Stencil
Simon Says Stamp Thankful for You Dies
Wendy Vecchi Make Art Station
Tim Holtz Distress Ink Colors: Rusty Hinge, Mustard Seed, Lucky Clover and Wilted Violet

Key Tips:
Cut down the additional panel created in the previous card into two pieces measuring 5 1/8" x 2 1/2"
Ink blend the 4 colors onto a piece of cardstock of similar size to the Chunky Thankful Diecut and diecut, preserving the inlaid pieces. Diecut the base layer out of brown cardstock and another outline out of white cardstock
Apply foam tape to one of the stenciled panels
Assemble as shown. I used the Make Art Station to hold my card base in place while i was aligning layers
This blend is so fun!

Fully assembled Fall Rainbow:

LARGE THANKFUL CARD - Ink-blended Diecut, Matching Stenciled Leaves and Jewels
Card Base Size: 4 1/4" x 5.5"
Brown Card Front Mat: 5 5/8" x 5"
Card Front Mat: 5 1/2" x 4 7/8"
Featuring:
Simon Says Stamp Leaf Wreath Stencil
Simon Says Stamp Ornate Leaves Dies
Simon Says Stamp Reverse Sentiment Strips
Wendy Vecchi Make Art Station
Tim Holtz Distress Ink Colors: Rusty Hinge, Mustard Seed, Lucky Clover and Wilted Violet

This is the absolute easiest of the trio, so no instructions are needed. I'll share some photos so you can follow along using the last remaining piece of of your stenciled panel.
The ornate leaves are gorgeous!!!

These sentiments are so sweet, I can't wait to share this with someone.

Three fun fall cards for you to try.


I hope you enjoyed your visit! Did you have a have a favorite card today? Tell me all about it in the comments.
Thanks for stopping by Lovelies! See you soon!
SUPPLIES:
I listed the products that I have used below. Please note that these are compensated affiliate links used at no cost to you. I really appreciate your support. Simon Says Stamps STAMPtember Release products were provided as part of my Design Team package. Click on the icons below each product picture to shop with SimonSaysStamp.com.


Oh wow! These are just gorgeous ... I love how you got so many colours on each leaf!
I have a crush on stencils too, they are versatile and not expensive but I don't own layered stencils (yet LOL) Awesome cards, your cards make me always happy with your beautiful and bright colours. My favorite is the script Thankful card, awesome! Thank you so much for sharing, stay safe and have a wonderful day.