

Simon Says Stamp - Good Luck Charm Release Blog Hop, Day 1
- Keisha Diann

- Feb 18, 2022
- 4 min read

Hi Lovelies!
Thank you for joining us for Day 1 of Simon Says Stamp's Good Luck Charm Release Blog Hop! I'm seeing green in the best way possible with this pair of Lucky Friendship cards.
One background became the focal point of two cards that are all about celebrating our besties!

The Linking Luck Clovers die is perfect for creating shaker cards, but I wanted to use both the negative space space and the cut-out so I could make two cards to share with you.
Below is a quick snapshot of our key supplies, the full supply list is linked for your convenience here and in the Supply Gallery at the end of this post.


When you shop for the items you want, remember to use the YUM20 code when you check out an celebrate Simon Says Stamp's 20th Birthday with the Birthday Cupcake Stamp Set FREE with ANY purchase! This promotion will expire on 2/20 at 11:59 pm ET or while supplies last.
Now let's go shake things up with our Lucky card duo.
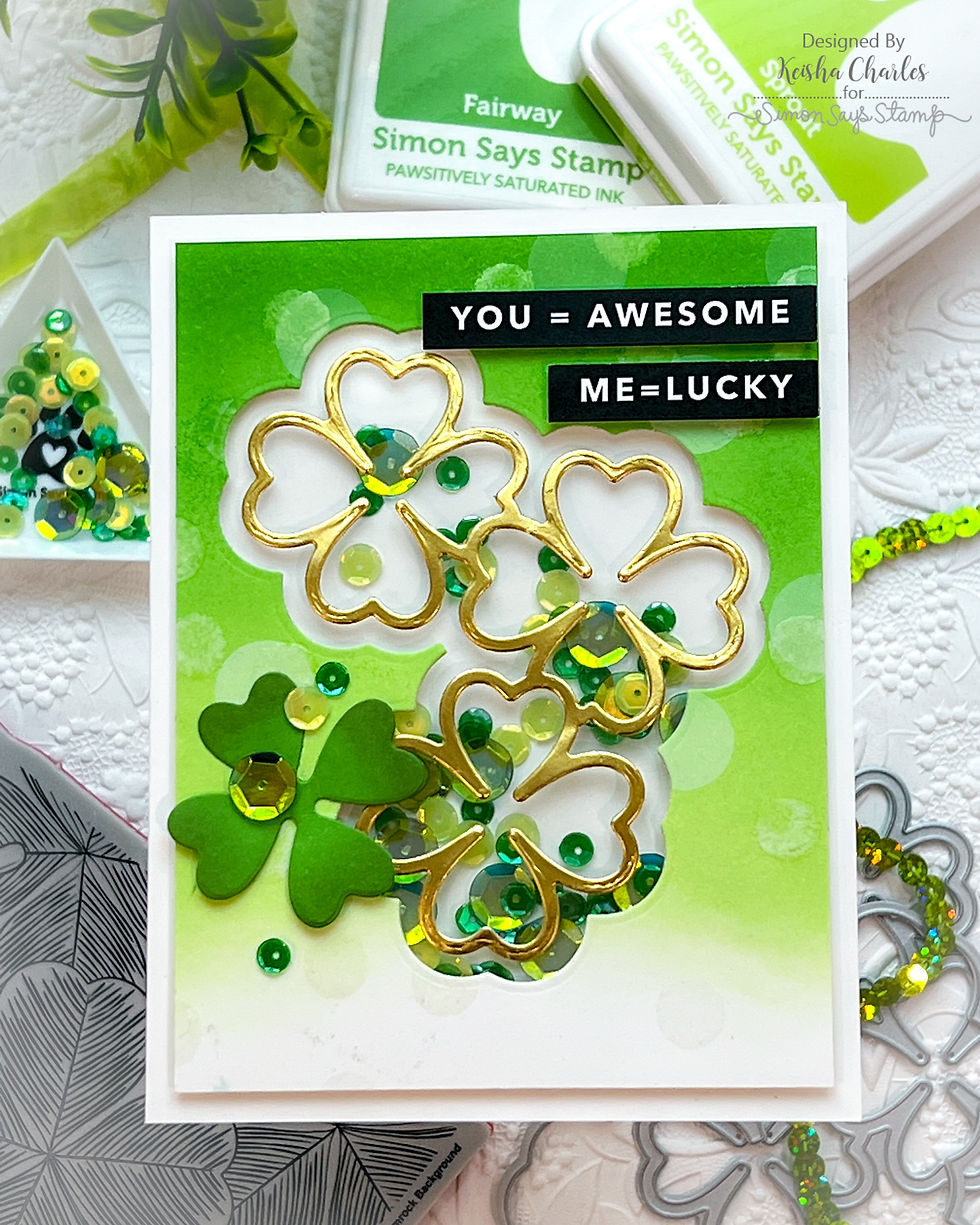
YOU = AWESOME, ME = LUCKY CARD - Ombre Ink-Blended, Polka-Dot Stenciled Shaker
A2 Card Base: 4 1/4" x 5 1/2"
Ink-Blended Layer: 3 3/4" x 5"
Acetate Layer: 3 5/8" x 4 7/8"
Featuring:
Simon Says Stamp Pawsitively Saturated Inks - Sprout, Fairway, Field
Additional supplies linked in the Supplies Gallery at the end of this post

Prepare the Card Front
Blend Sprout ink onto a Card Front 3/4 down the cardstock
Add Fairway ink over the top 1/2
Stencil Picket Fence Distress Ink over the ink-blended panel using the largest-sized dots size of the Confetti Stencil
Stencil Distress Embossing Ink through the medium-sized dots stencil layer
Dust with Clear Embossing Powder
Heat set with Embossing Tool


Make the Shaker
Select the outline die from the Linking Lucky Clovers die set
Secure the outline die to the card front with low tack tape like 3M Artist Tape or Thermoweb Pixie Tape and diecut
Adhere the acetate layer to the diecut card front using a glue runner or Simon 1/4" Red Line Tape
Apply foam tape to the acetate


Apply and Store Sequins
Simon Says Stamp sequins come in little Ziploc bags which are quire handy but getting sequins back into that bag or the little plastic containers that I store mine in is not my favorite activity.
So these little Triangle Trays are a life saver to hold your smaller craft embellishments and allow you to get them back into their storage bag/box with ease.


For this shaker, strategically place several sequins with the Embellishment wand and adhere several sequins with Simon's Craft Tacky Glue to the card front so that they remain in place and always on display while the loose sequins shake when the card is moved.
Give the glued sequins a few minutes to dry and then add additional sequins on top before adhering the die-cut card front to the sequined card base
Diecut matte gold cardstock using the inner "section" of the Linking Luck Clovers die set and adhere to acetate on card front


Prepare Embellishments
Diecut a clover out of 110lb white cardstock and ink with Fairway and Field inks
Trim selected sentiment strips
Adhere to the card front to finish


This has got to be some of the happiest green inks that I have!.
XOXO SWEET THING CARD - Ombre Ink-Blended Negative Die-cut on Stamped Background
Card Base: 4 1/4" x 5 1/2"
Stamped Layer: 4" x 5 1/4"
Featuring:
Simon Says Stamp Pawsitively Saturated Inks - Sprout, Fairway, Field
Additional supplies linked in the Supplies Gallery at the end of this post

As you have done most of the work with preparing the diecut focal point, just some simple inking, stamping and die-cutting to finish his card.
Here are some pics to help you along the way!


Can we just take a moment to appreciate the gorgeous Shamrock Background Stamp?


Last look at both of our beauties!
I hope you enjoyed this stop on the hop and I want to make sure that you get the most of today's blog hop, so take note Lovelies:
Be sure to explore the AMAZING Gallery that is packed with inspiration from this release!!!
Speaking of inspiration, since this is Day 1 of the Blog Hop stay tuned for all the awesomeness that will be shared on Day 2
Check out the full supply list below for your shopping convenience
When you shop for the items you want, remember to use the YUM20 code when you check out so that you can get the Simon Says Stamp's 20th Birthday with the Birthday Cupcake Stamp Set FREE with ANY purchase! This promotion will expire on 2/20 at 11:59 pm ET or while supplies last.
Comment to on this post to be eligible to win a $25 coupon from Simon Says Stamp. Winners will be chosen and posted on the Simon Says Stamp blog on Wednesday, the 26th of January. Winner should email Simon Says Stamp to claim his/her prize
I'd love to hear from you in the comments about which card was your favorite.
Thanks again for stopping by and I hope to see you again soon Lovelies! Now, do go and check out what Heather Ruwe has in store for you!
HOP ORDER:
SUPPLIES:
I listed the products that I have used below. Please note that these are compensated affiliate links used at no cost to you. I really appreciate your support. Simon Says Stamps Good Luck Charm Release products were provided as part of my Design Team package. Click on the icons below each product picture to shop with SimonSaysStamp.com.


Stunning cards Keisha, totally love the shaker card as well as the beautiful bright green colour. Thank you so much for sharing, stay safe and have a wonderful day.
I so love the gold clovers. BEAUTIFUL!!!!!
Love your creations! so fun!! Thanks for sharing your inspiration!
Both cards are wonderful, love the shaker card, so festive and fun. The color and the stencil and the fun shaker mix, and the diecuts are perfect together. Thanks for all the photos!
Appreciate all the photos of the process. Such great festive designs