

Simon Says Stamp - Born to Sparkle Graduation Card Trio
- Keisha Diann

- Apr 28, 2021
- 4 min read

Simon Says Stamp's Born To Sparkle release is packed with goodies and today's post focuses on a trio of cards celebrating the graduates in your life!
Each card is relatively simple as long as you are thoughtful about your color choices and measurements. The Congrats card showcases some rainbow ink-blending and no-heat foiling! The One Degree Hotter and Hooray cards are all about layering compatible colors with no masking.

A full supply list is at the bottom of this post, but I'd like to highlight a few key Simon Says Stamp Born to Sparkle release items now.
Congrats on a Line Wafer Dies
Class Act Stamp Set
Cap and Gown Wafer Dies


Now that you have your supplies, let's make some cards!
Congrats Card
The heart of this card is that eye-catching rainbow diecut. The Congrats on a Line Wafer Die Set comes with two dies and I chose the longer one for this Slimline card. I spent a long time being afraid of foiling, but this simple technique give you a rockstar look without needing a laminator.

KEY TECHNIQUES
Making the Rainbow Die-Cut
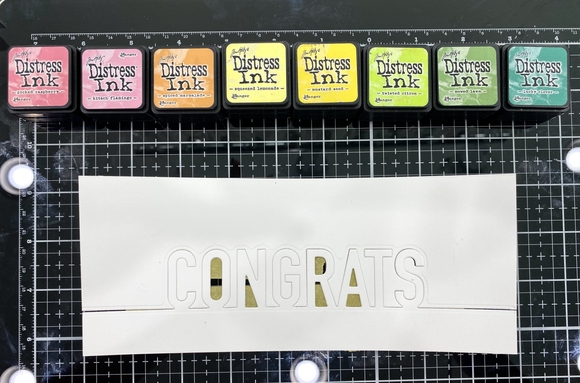
This Slimline card measures 3.50" x 8.50" when folded, so for the Congrats sentiment strip cut 2 strips of white cardstock measuring 2.50" x 8.50" and 2.50" x 8.50".
Die-cut each using piece using the larger Congrats on a Line die and leaving an ~0.75" and 0.50" border respectively along the bottom .
Apply some low-tack crafters tape like Purple Tape to the back of the letters on the larger diecut to hold them in place for blending.
Use a blending tool to apply color to the Congrats diecut with the larger border, coloring each letter in a different ink. I used Distress Ink Picked Raspberry, Kitsch Flamingo, Spiced Marmalade, Mustard Seed, Twisted Citron, Mowed Lawn and Lucky Clover. Pick your favorite rainbow and have fun!
Layer your colored diecut onto the white one with a slight offset to create a shadow effect.
Use foam tape to back your diecut and set aside for when you are ready to assemble your card.
Diecut a cap and tassels out of black and gold cardstock as shown. (I like to use a Xyron Sticker Maker to apply adhesive for assembling some of my smaller diecuts.)


Making the Diagonal Foil-Striped Background
Foil plates are very convenient but I did not have one in the pattern I wanted to use for this card, so I "handmade" my pattern with the help of a ruler and some double-sided adhesive.
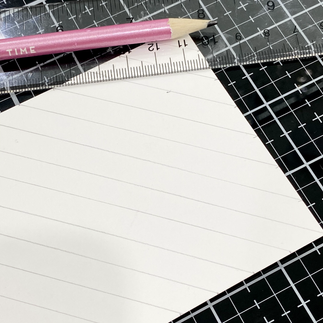
Mark 0.50" intervals all the way around a 3.50" x 8.50" piece of white cardstock using a ruler and pencil
Draw light diagonal lines to join the marks as shown below
Cut and place strips of 1/8" wide double-sided tape on top of the diagonal lines as shown, trim the excess and then remove the protective backing to reveal the adhesive
Place a pice of the gold foil carefully over the adhesive-covered cardstock and rub your fingers gently along each line to press the foil into the adhesive strip
Gently peel back the foil diagonally from one corner to the other to reveal your diagonal stripes. (Save the foil remnants for another project!)


Assembling the Card
Foil plates are very convenient but I did not have one in the pattern I wanted to use for this card, so I "handmade" my pattern with the help of a ruler and some double-sided adhesive.
Stamp and heat-emboss the "We're so proud of you" sentiment onto a strip of black cardstock.
Gather the graduation cap diecut, congrats diecut and foil-striped panel
Adhere the foil-striped panel to a Slimline card base and layer with the Congrats die-cut and accent with the grad cap
Use the Image below as a guide.


One last look!

Hotter By One Degree Card
This card relies on using inks for the same color family or adjacent color family in gradually darker tones so that the previous ink does not clash or overpower the ink after it. I wanted to visually play on the "hotter by one degree" pun by using colors that got progressively warmer.

KEY TECHNIQUES
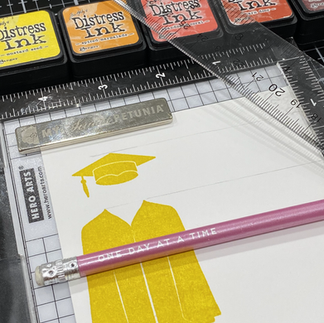
Draw a straight line in pencil 0.50" down from the top (long side) of a piece of A2 sized cardstock (4.25" x 5.50"). Repeat the line one inch below the 1st line. These will be your guide for where to stamp the cap and gown respectively from the Class Act Stamp Set.
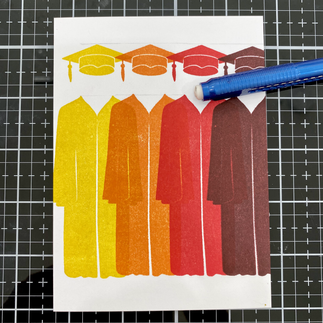
Though initially selected 5 colors I ended up using 4 shades of Distress Ink once I figured out the horizontal spacing of the cap and gown. They are Mustard Seed, Spiced Marmalade, Barn Door and Aged Mahogany.
Position the Cap and Gown in your stamping tool and stamp each color overlapping the last, starting with the lightest, going to the darkest as shown.
Trim 1/8" off off the left and right sides of the panel
Stamp and heat emboss the sentiment onto black cardstock and diecut/punch into a circular shape.
Assemble card to finish


Hooray Card
This is the easiest of the three cards and requires little explanation outside of picking your favorite colors or....maybe the graduates school colors and randomly stamping them over the A2 card panel to make them appear as if they had been thrown into the air!
Fun, right?!?!

I hope you will try one or all of these three! Links are below for your shopping convenience.
See you soon Lovelies!
SUPPLIES:
I listed the products that I have used below. Please note that these are compensated affiliate links used at no cost to you. I really appreciate your support. All Simon Says Stamps Born to Sparkle Release products were provided as part of my Design Team package. Click on the icons below each product picture to shop with SimonSaysStamp.com.


Kaiser OTC benefits provide members with discounts on over-the-counter medications, vitamins, and health essentials, promoting better health management and cost-effective wellness solutions.
Obituaries near me help you find recent death notices, providing information about funeral services, memorials, and tributes for loved ones in your area.
is traveluro legit? Many users have had mixed experiences with the platform, so it's important to read reviews and verify deals before booking.
Gorgeous cards with products of a great release.
Beautiful idea for foil use, love that background. Thank you so much for sharing your inspiration Keisha, stay safe and have a wonderful day.