

HoneyBee Stamps - Sealed With Love Release
- Keisha Diann

- Dec 30, 2021
- 5 min read

Hello Lovelies! Brace yourself, I took a lot of pics getting ready for the recent HoneyBee Stamps Sealed With Love Release and it taken me a moment to pull this together, but hopefully you find it helpful in exploring some ideas with the new goodies!
I clearly went very floral in my choices for the release cards which was not planned, but if you are like me, you can't complain about flowers! :-)

Two of the cards focus on inking diecuts and two focus on fancy-schmantzy (technical term) stenciling.
Here's a quick peek at the Sealed with Love Release supplies showcased in the cards:


Click here to view the full supply list or check out the one linked in the gallery at the bottom of this post when you have finished exploring this card.
Let's take a closer look at our Sealed with Love Cards!
THANKFUL FOR YOU AND HELLO YOU CARDS - Inked/Ombre Ink-Blended Sentiment Die-cuts, Paired With Patterned Paper
Card Base: 4 1/4" x 5 1/2"
Patterned Paper Layer: 3 1/4" x 4 1/2"
Featuring:
Honey Bee Stamps You Buzzword Die
Honey Bee Stamps You Buzzword Stamp Set
Honey Bee Stamps Free Bee A2 Paper Pack* OR Honey Bee Stamps Hugs & Kisses A2 Paper Pad
Distress Oxide - Tattered Rose, Barn Door, Fired Brick, Shaded Lilac, Wilted Violet, Brushed Corduroy, Gathered Twigs
Honey Bee Stamps Quilted Cover Plate
* - this paper pack is only available with purchases directly from the Honey Bee Stamps website. As an alternate, the Hugs & Kisses A2 Paper Pad has some great patterned paper options.

A couple of quick notes on this pair of cards:
the custom-colored die-cuts were created by pairing Distress Oxide colors with the cardstock in the paper packs
hello YOU Card - base and top layer of each letter is cut from paper inked on the bottom with the lighter color and on the top with the darker color
Y - Shaded Lilac, Wilted Violet
O - Tattered Rose, Barn Door
U - Brushed Corduroy, Gathered Twigs

Thankful for YOU Card - the "you" cursive die is cut twice and layered for dimension from paper inked on the bottom with the Barn Door and on the top with the Fired Brick
the patterned layer is sitting on an A2-sized piece of white cardstock but with the Quilted Cover Plate
the "Thankful For" sentiment is stamped on cardstock inked with Wilted Violet

Coordinating jewels from my stash finish the cards:

I think that you can see the quilted die-cut base better in this picture:

Last look at the pair!

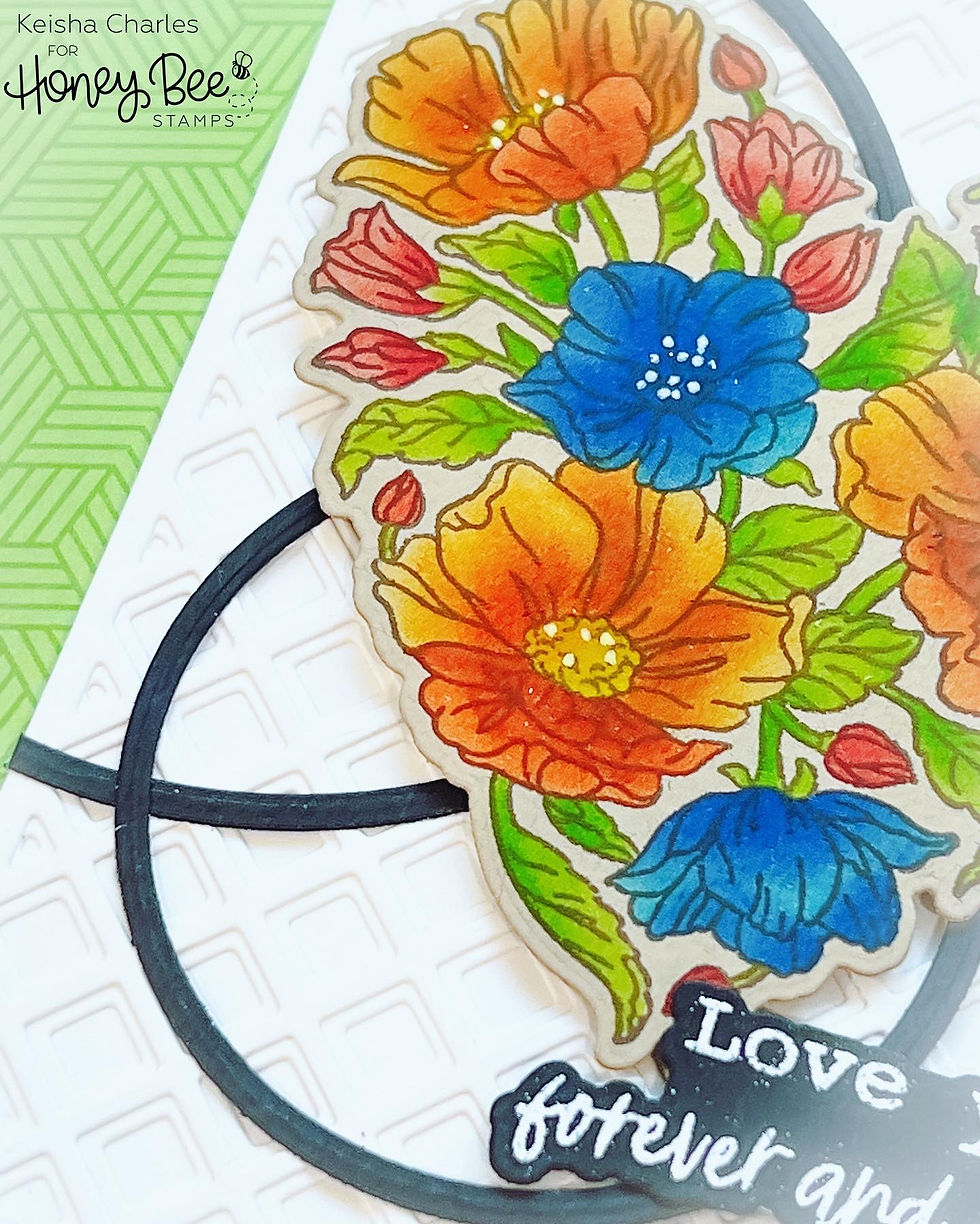
FOREVER AND ALWAYS CARD - Stencil Coloring and Layered Geometric Die-cuts
Card Base: 4 1/4" x 5 1/2"
Featuring:
Honey Bee Stamps Hello Sweetheart Stamp Set
Honey Bee Stamps Hello Sweetheart Die Set
Honey Bee Circle Thin Frames Die Set
Honey Bee Garden Lattice Cover Plate - Base
Honey Bee Garden Lattice Cover Plate - Top
Memento Espresso Truffle Ink
Ranger Detail Blending Tools
Uniball Signo White Pen
Distress Ink - Twisted Citron, Mowed Lawn, Mustard Seed, Barn Door, Salty Ocean, Blueprint Sketch, Spiced Marmalade, Ripe Persimmon, Rusty Hinge

There are two tools that help me when doing this kind of stenciling:
Wendy Vecchi Make Art Staytion - to keep my stencil in place
Ranger Detail Blending Tools - to stencil in small areas, each pack comes with 5 tools, you will need 2 packs
Prepare Card Base
Stamp floral heart on Kraft cardstock in Espresso Truffle Ink and adhere back to Make Art Staytion with purple tape (for some added security that it will stay in place)
Position the Leaf Stencil Layer over the Kraft Cardstock and secure with magnets


Ink Leaves


Tap and rub gently in a circular motion one end of the Detail Blending Tool in the Twisted Citron Distress Ink. I will generally start with the lighter color over the whole area (in this case the leaf). Hold the Blending Tool upright and rub gently over the open areas in the stencil to color the leaves in Twisted Citron
Flip the Blending Tool over to a fresh side, hold at an angle to ink using the edge of the tool with Mowed Lawn Distress Ink. You are just inking to darken some sections of the leaves where shadows or deeper tones of the leaf would appear
Positioning the stencil and keeping it still is very important to coloring within the lines:

Ink Flower Centers


Color flowers centers with Mustard Seed Distress Ink
Ink Small Flowers and Buds


Color small flowers and buds with with Barn Door Distress Ink
Ink Medium Flowers


Color medium flowers first with Salty Ocean Distress Ink and then with Blueprint Sketch
Use the darker color towards the center and bottom of the petals and leave lighter portions towards the tops of the petals
Ink Large Flowers


Color the top sections of the large flowers first with Spiced Marmalade Distress Ink
Color the bottom sections of the large flowers next with Ripe Persimmon Distress Ink
Use Rusty Hinge Distress to color towards the center and bottom of the petals and leave lighter portions towards the tops of the petals
Fully Inked Heart

Highlight Flower


Add white dots to highlight the flower center using a Uniball Signo White Pen
Stamp and Diecut Card Components


Die-cut the floral heart using the matching Hello Sweetheart die
Die-cut the lattice card front layers out of white cardstock using the Garden Lattice layers Top and Base dies. Adhere the layers using Bearly Craft Glue
Die-cut the black circle frames by using four Sweet Stacks Circles positioned as shown on black cardstock
Add Foam Tape to Floral Heart (and sentiment)


Assemble as shown to finish:

I can't help a few more close-ups on these flowers, I am so thrilled about how easily you can color with these layering stencils!!!

HERE FOR ALWAYS CARD - Inked Layered Die-cuts on Pierced Die-cut Card Front
Card Base: 4 1/4" x 5 1/2"
Featuring:
Honey Bee Stamps Lovely Layers Roses Die Set
Honey Bee Stamps Bitty Buzzwords Be Mine Stamp Set
Honey Bee Stamps Bitty Buzzwords Be Mine Die Set
Honey Bee Stamps Swirling Leaves Pierced A2 Cover Plate
Distress Ink - Dusty Concord, Villainous Potion, Wilted Violet, Shaded Lilac, Ripe Persimmon, Abandoned Coral, Worn Lipstick, Pine Needles, Lucky Clover, Mowed Lawn, Twisted Citron

Distress Ink Color Palette

Diecut Flower Layers and Pierced Card Front (not showing flower stem or card front)

Ink Flower Layers


Base Layers - from top to bottom, Dusty Concord, Villainous Potion, Wilted Violet, Shaded Lilac
Top Layers - Ripe Persimmon, Abandoned Coral, Worn Lipstick
Assemble Flower, Stamp and Die-cut Sentiment Components

Layer as shown and add rhinestones to complete card
Last look!

YOU ARE LOVED ALWAYS CARD - Stencil Coloring with Vellum and Cardstock Die-cuts
Card Base: 4 1/4" x 5 1/2"
Featuring:
Honey Bee Stamps Layered Lace Stencil Set
Honey Bee Stamps Bitty Buzzwords Be Mine Stamp Set
Honey Bee Stamps Lovely Layers Roses Die Set
Honey Bee Stamps Quilted A2 Cover Plate
Distress Oxides - Hickory Smoke
Distress Ink - Squeezed Lemonade, Mustard Seed, Shabby Shutters, Peeled Paint

Ink Lace Outline - Hickory Smoke Oxide


Ink Roses - Squeezed Lemonade and Mustard Seed Inks


Ink Leaves - Shabby Shutters and Peeled Paint Inks


Prepare Sentiment


Stamp Sentiment into center of Stenciled Lace Layer
Cut down Stenciled Lace Layer to 4" x 5 1/4"
Diecut with Sweet Stacks Rectangle and then Pierced Quilted Die
Adhere Stenciled Lace Layer to Matte Silver A2 Card Front
Pop up Sentiment Diecut with foam tape
Die-cut Vellum and Black Cardstock Rosebuds and Ink Sentiment Diecut - Squeezed Lemonade and Mustard Seed


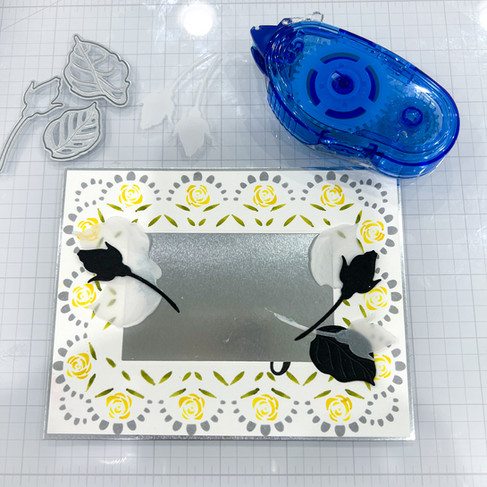


Layer on card base and add your choice of jewels to finish!


Last look!

Lovelies, thank you so much for visiting today! Whew, that was a marathon, but I really hope that you found the post helpful and I am always curious to know your favorites, so leave me a little love in the comments!
See you soon!
SUPPLIES:
I listed the products that I have used below. Please note that these are compensated affiliate links used at no cost to you. I really appreciate your support. All stamps used today were part of my maker package from Simon Says Stamp. Click on the icons below each product picture to shop with SimonSaysStamp.com.


They are all beautiful Keisha and yes you are right about the awesome flower heart. I'ts a close call but roses are my favorite flowers and this one is soooo special with the stunning colours, so I stay with the rose as my favorite.
Oh wow! These are just gorgeous ... thanks for the detailed instructions!
Just gorgeous! Don't have any of these dies/stamps and am not in the position to buy them right now, but you certainly make me long for them! Stunning, original, yet you make creating them accessible to everyday cardmakers like me!