

Simon Says Stamp - STAMPtember® 2020 Blog Party
- Keisha Diann

- Sep 2, 2020
- 7 min read

Hi Lovelies!
Welcome to the STAMPtember® Blog Party presented by Simon Says Stamp! Have you ever been to a party that lasts all month long??? Today is just the start but I hope that you will keep checking in with Simon Says Stamp throughout September for updates on releases and special offers.
Speaking of special offers, as a member of the Simon Says Stamp Design Family, I have one for you today, please keep reading for details. I've also shopping links for the products I used at the bottom of the post in the Supplies section.
I don't know what happened, but I ended up making SEVEN cards with this stencil set, so I hope that you will be inspired to have fun too.

I will take any excuse to use a stencil (*see below), so I was super happy to open my Simon Says Stamp STAMPtember Design Package and see a stencil. To be more accurate, not just one stencil, but THREE, in the cutest set called Simon Says Stamp Simple Patterns Trio.

Stencils were one of the first crafting products that I fell in love with, here are 5 reasons why:
1.) They are easy to use
2.) They are inexpensive
3.) They can be used with a variety of media - ink, paint, glitter, pastes, sprays, the kitchen sink...
4.) They can be layered to produce new patterns
5.) They are durable - wipe/wash and go
Ready to explore the cards?
Card 1 - "Love You" Glitter Stripes Rainbow
Let's get started. I don't know about you, but I bring rainbows and glitter to my parties...hence my first card.

I love an opportunity to ink blend and the Diagonal Stripes stencil told me that it wanted to be a rainbow. As we are drifting towards Fall, I selected some deeper hues of Distress Inks for the rainbow - Seedless Preserves, Chipped Sapphire, Mowed Lawn, Mustard Seed, Spiced Marmalade and Fired Brick.

I got to work on ink blending, starting from the bottom of the stencil with Seedless Preserves and worked my way to the top, finishing with Fired Brick.

Once I was satisfied with my ink-blending, I left the stencil in place and added a thin layer of a white transparent glitter paste. I then removed the stencil, dropped it into a my Stencil Bath (fancy name for shallow dish with water) and then set aside the glittery rainbow to dry.
I kept this dish handy throughout the day to drop my messy stencils into so that that my pastes and other media would not dry onto the stencil and distort it for future use.

Once dry, my "blinged up" rainbow was ready for trimming and light embellishment with the Simon Says Stamp + CZ Design Love You 2 diecut.

I chose foil for the bottom layer of the sentiment to pick up on the glitter in the stripes and finished with a small good heart sticker from my stash.

Card 2 - "Wish You Were Here" Gradient Stripes
Here I continued with the ink-blending through the stencil technique, but this time using Distress Oxides.

For this card, I focused on using half of the stencil along the longest edges of my card front to create a simple pattern that would frame my sentiment. I chose more of my personal Fall palette, this time Distress Oxides in Chipped Sapphire, Seedless Preserves, Fired Brick and Spiced Marmalade. The stencil was positioned to create stripes about 1" long from the left and right edges of the card front.

Tip: I used a piece of paper towel to shield the part of the card front that I was not working on from my ink-blending accidents (see below).

With the ink-blending/stenciling done, my card was ready to get sentimental. :-)

The Simon Says Stamp Greeting Mix 2 is such a versatile collection of sentiments in contemporary and "brushy" fonts and it's "Wish You Were Here" sentiment was the perfect shape for this card.

After stamping the sentiment in Distress Oxide Chipped Sapphire, I decided to also give card front a little trim along the sides to showcase silver foil layers and add a Simon Says Stamp Etched Dragonfly diecut in the same foil cardstock.

That dragonfly is a favorite of mine, it has so much delicate detail in such a small shape. I added a little silver bling from my stash and it was time for a happy dance!

Card 3 - "So Good" Dots
I love that stencils let me complete a card in minutes and this next cutie is ridiculously easy!

For this card, I selected the Polka Dot rectangle stencil, Distress Inks in Twisted Citron Cracked Pistachio and Peacock Feathers and a mini inking tool I used the Detail Blending Tool to randomly ink the dots in each color to create a multicolored pattern right in the center of my card front.

I choose the "So Good" sentiment from the Simon Says Stamp + CZ Design So Far So Good stamp set. It was almost as large as my stenciled dot rectangle. I stamped it directly over the pattern repeatedly in black ink until I was happy that it stood out boldly and evenly from the dot pattern.

I then paired it with the "To See Your Success" sentiment from the same set embossed in white on a strip of coordinating card stock.
Card 4 - "Big Thanks" Gradient and Florals
I was no where near ready to give up on ink-blending, but wanted to go for a more subtle gradient this time. I have been a bit in love with yellow lately, so I decided to explore what that might look like though the horizontal stripes stencil.

For the yellow gradient, I started with Distress Inks in Fossilized Amber and continued with Mustard Seed, Squeezed Lemonade and Antique Linen for a happy pop of yellow on this thank you card.

The gradient layer was ready for the "Big Thanks" sentiment from the Simon Says Stamp + CZ Design All The Thanks stamp set for a striking a clear message.

Now ready for a background, I created a hand-stamped black and white floral backdrop by randomly stamping a selection of the smaller flowers from the Simon Says Stamp Fabulous Florals stamp set around the border of a white A2 (4 1/4" x 5 1/2") piece of card stock. The yellow gradient layer found it's home in the center and voila!
Card 5 - "With Sympathy" Gradient and Diecut Florals
I went back to the diagonal stripes stencil and went for another gradient in peach and purples that also reminded me of Fall.

This time I flipped the direction of the stencil and chose Distress Inks in Dried Marigold, Victorian Velvet and Seedless Preserves.

Tip: If you are struggling with ink-blending, be patient and remember practice and a light touch will get you the results you want...and if all else fails, switch to Distress Oxides which are creamy, luscious and very forgiving when ink-blending.
The soft and rich tones of the inks made me select the "With Sympathy" sentiment from the Simon Says Stamp + CZ Design Clean Lines Everyday stamp set for this card. I finished it the Simon Says Stamp Floral Bundle diecut whose clean, graceful lines matched the mood of the card and sentiment.

Cards 6 and 7 - Thinking of You Heart and You're Fantastic Sunflower
After ink-blending my heart out, I wanted to add dimension to my stenciled cards with texture paste and then add color by using ink sprays.

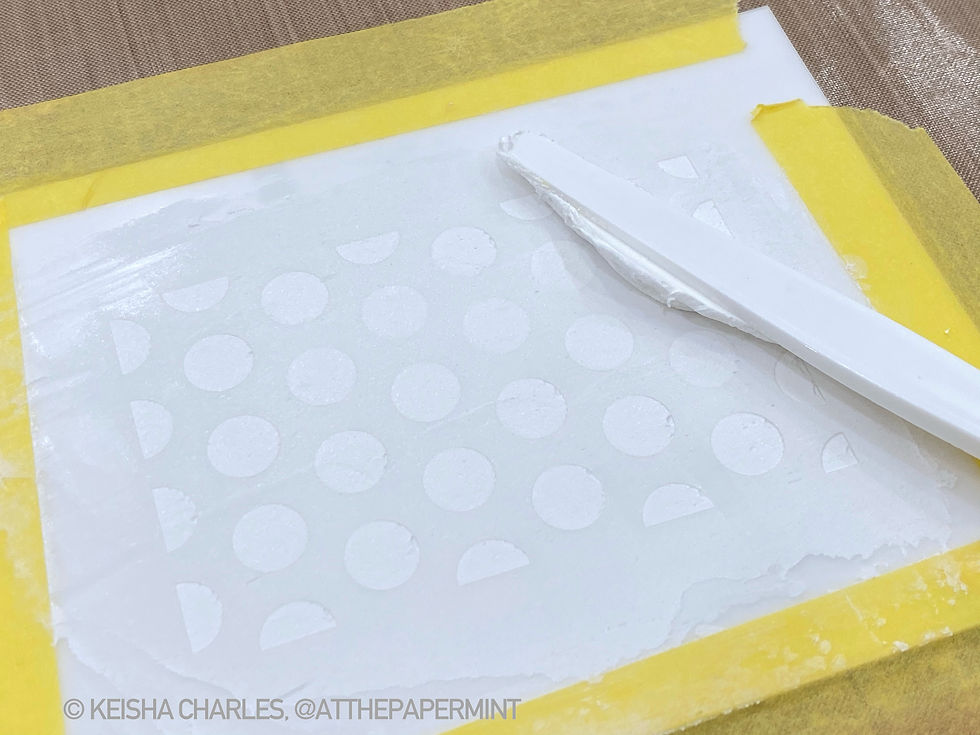
I did my stenciling first, so that the sprays would also color the white texture paste that I used. On the "Your Fantastic Sunflower" Card, I kept it very "vanilla" and centered the stencil over my A2 size piece of watercolor cardstock and carefully applied a thin, even layer of texture paste through Polka Dots stencil.

On the "Thinking of You Heart" Card, I went for a purposely messy and unrestrained polka border around the A2 watercolor cardstock. Since the stencil is petite, it's not exactly intended to do this. In order to repeat the pattern while the texture paste was still wet, I would smudge the prior section of the border, but I liked the grungy effect. The Stencil Bath was front and center for these festivities!

Once dry, the well-behaved and the messy stenciled panels were ready for a whole lot of Distress Spray Inks. The well-behaved panel got saturated with Picked Raspberry, Festive Berries and Spiced Marmalade. The messy panel was sprayed with Picked Raspberry and Blueprint Sketch.
I went way overboard on the spray, but I'm not sorry, the watercolor cardstock could handle it, but also needed some drying time.
Tip: To speed up the drying, you can use a Heat Tool, which I do occasionally, but I often find that I like the way the color looks best when I allow it to dry naturally.


Given all the color that I heaped on those card fronts, I stuck with simple and distinct white diecuts. The Simon Says Stamp Sunflower Stem dies for the well-behaved polka dot panel and the solid heart from the Simon Says Stamp Thinking of You Heart die set for the messy polka dot panel.

I kept both the outline white cardstock and the inlay pieces of the sunflower. I backed them with a vellum "background" layer of the sunflower to soften the harshness of the white against that vibrant background.

I used vellum again to create a torn edge layer along the left and right sides of my trimmed messy panel to coordinate with the distressed look of the card.
For a finishing touch, I used the "You're Fantastic" sentiment from the Simon Says Stamp Amazing stamp set to complete the (well-behaved) Sunflower card and "Thinking of You" sentiment from the Simon Says Stamp Greetings Mix 2 stamp set for the (messy) Heart card.

Whew! I hope that you enjoyed all the pretties and that you will consider adding this handy little stencil to your cart while you take advantage of the Special Offer.
Special Offer:
As promised, see details below about the Special Offer and be sure to check in with the other Simon Says Stamp Design family members for even more inspiration and other amazing offers at the Blog Party!

Blog Party Link:
Grab your party hat and go get inspired by the work of the rest of the Design Family at the Blog Party!
Blog Party Link:
The cards will be posted to the STAMPtember® Gallery, where you can also see other cards created the Design Family for this amazing release!
SUPPLIES:
I listed the products that I have used below. Please note that these are compensated affiliate links used at no cost to you. I really appreciate your support. All products were personally purchased, except for the stencils, which were received from Simon Says Stamp. I was not paid to do this post and love the products that I share. Click on the dog below each product picture to shop with Simon Says Stamp.


Love the way you used those stencils. Thought the way you made the Wish you were here card was very clever. I never would have thought of that! Looking at your work space on your blog photo made me envious of that, too! >:) What I would give for that space and the ability to keep it so neat!!!