

Tim Holtz Under the Sea Launch!
- Keisha Diann

- Apr 3, 2021
- 4 min read

It's going to be hard to resist these new additions to the Colorize line! This time we are going to the beach and into the waves to meet 9 new friends in the two new "Under the Sea 1" and "Under the Sea 2" Colorize die sets.


Join me as I make a series of cards by coloring Distress Watercolor Cardstock with Distress Inks and Distress Crayons to bring my sea creatures to life!
In each of my projects, I decided to use my Distress colors via ink pads, sprays, reinkers and Crayons to color the various layers of my Colorize dies and my backgrounds. Don't worry about having all or the different types of colors.
For example, if you don't have Sprays and are not going to buy them, but you have the Reinkers, substitute that instead to color with your diecut layers and backgrounds. All of the distress color mediums are beautiful and can be interchangeable for this particular project. Also, if you don't want to custom color your paper, you can always use your own stash of solid colored cardstock. Have fun!
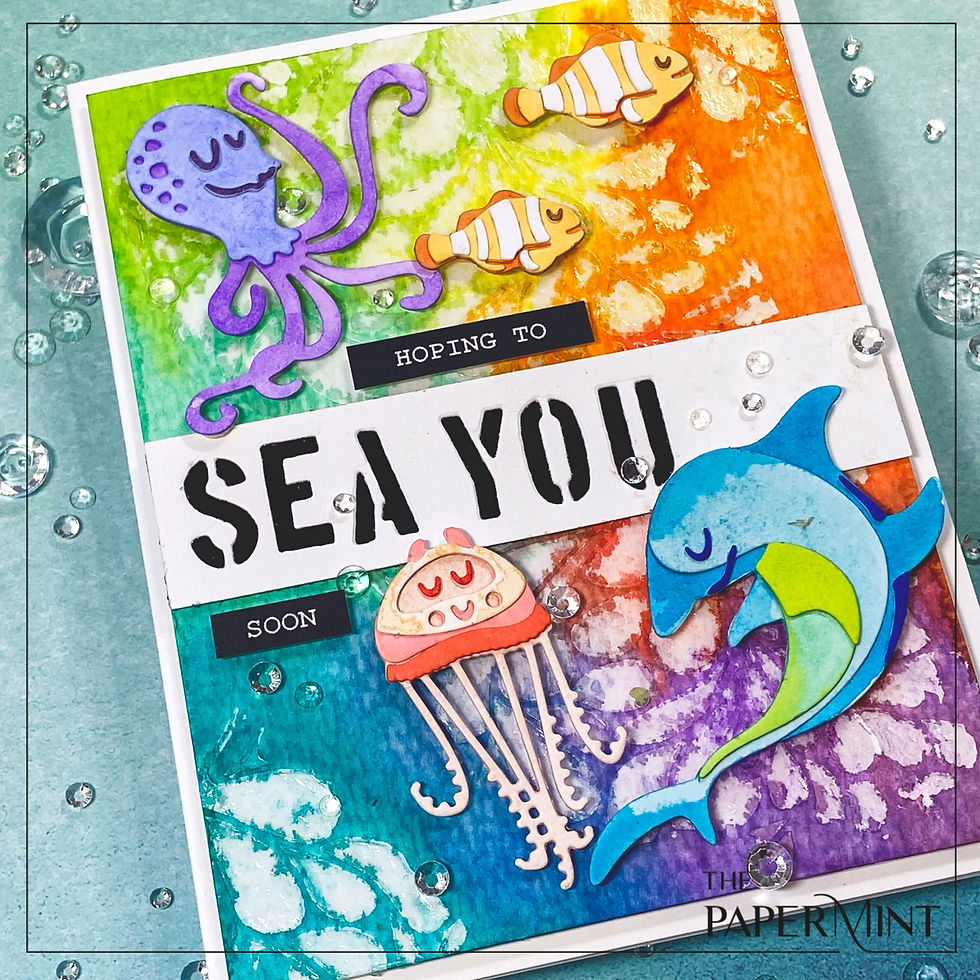
Card 1 - Sea You
Featured Card Supplies
Sizzix Thinlits Die - Under the Sea 1 by Tim Holtz
Sizzix Thinlits Die - Treat Bag by Tim Holtz
Stampers Anonymous Splash Stencil by Tim Holtz
Distress Collage Medium
FOR BACKGROUND: Distress Spray Stain or Ink- Peacock Feathers, Cracked Pistachio, Twisted Citron, Spiced Marmalade, Abandoned Coral, Wilted Violet
FOR COLORIZE DIE LAYERS: Distress Ink - Twisted Citron, Cracked Pistachio, Tumbled Glass, Mermaid Lagoon, Wilted Violet, Shaded Lilac, Spiced Marmalade, Rusty Hinge, Ripe Persimmon, Dried Marigold, Worn Lipstick and Tattered Rose
Distress Watercolor Paper
Distress Sprayer
Palette Knife
Tim Holtz Media Mat
Tim Holtz Water Brush
Key Techniques
Apply Collage Medium with palette knife through Splash Stencil in patches across the card front and let dry.
Spritz Distress Spray Stain over dried medium onto cardstock; let the colors run together and dry. Tip: If you don't have the Sprays or prefer more control, use an ink blending tool to apply the colors to the Watercolor Cardstock.
Apply ink color to Media Mat directly from the ink pad, wet water brush and color small patches of the watercolor cardstock to correspond to the various layers of your colorize dies and let dry. (see below)


4. Die-cut and assemble the Colorize die layers.

5. For your sentiment, cut a ~1" x 4" strip of white cardstock and die cut with the words "SEA YOU" using letters from the Treat Bag die set, aligned to the left of the cardstock strip.
6. Finish card by arranging your sea creatures and add your sentiment backed with black cardstock.

Card 2 - Big Hugs

Featured Card Supplies
Sizzix Thinlits Die - Under the Sea 2 by Tim Holtz
Sizzix Thinlits Die - Alphanumeric Shadow Upper by Tim Holtz
Tim Holtz Stencils - Splash, Mosaic, String, Bubble, Leafy, Hearts
FOR BACKGROUND: Distress Ink or Reinker- Wilted Violet, Tumbled Glass
FOR COLORIZE DIE LAYERS: Distress Crayons - Twisted Citron, Mowed Lawn, Peeled Paint, Forest Moss, Tattered Rose, Worn Lipstick, Picked Raspberry, Abandoned Coral
Distress Watercolor Paper
Distress Heavystock White
Distress Sprayer
Tim Holtz Media Mat
Tim Holtz Water Brush
Key Techniques
For Background, spritz watercolor paper with water; apply ink color to media mat and mix with a wet water brush and brush onto the paper. Start with the Tumbled Glass in the center and add the Wilted Violet to the top and bottom edges. Let dry.
Apply Distress Crayon to Media Mat and dissolve by mixing with a wet water brush. Color small patches of the selected colors onto the Distress Heavystock to correspond to the various layers of your colorize dies as shown below.

3. Die-cut and assemble the Colorize die layers.


4. I created my own sentiments in Microsoft Word then print and cut it to size.
5. Finish card by arranging your walruses and add all your sentiments after die cutting and assembling the letters for Big Hugs.
Card Set 3 - Punny Trio

Featured Card Supplies
Sizzix Thinlits Die - Under the Sea 2 by Tim Holtz
Sizzix Thinlits Die - Alphanumeric Shadow Lower by Tim Holtz
Sizzix Sequins & Beads - Green Tea, Sorbet, Arctic Sky
Tim Holtz Stencils: Strings, Bubbles, Splash, Mosaic, Leafy, Hearts
FOR BACKGROUND: Distress Ink- Tattered Rose, Cracked Pistachio, Tumbled Glass
FOR COLORIZE DIE LAYERS: Distress Reinkers or Ink Pads. Crab Card - Worn Lipstick, Abandoned Coral, Dried Marigold. Turtle Card - Cracked Pistachio, Evergreen Bough, Lucky Clover, Pine Needles. Fish Card - Blueprint Sketch, Mermaid Lagoon, Tumbled Glass
Distress Glaze - Tattered Rose, Fossilized Amber, Cracked Pistachio, Rustic Wilderness, Speckled Egg, Broken China
Distress Embossing Dabber
Distress Heavystock White
Distress Sprayer
Tim Holtz Media Mat
Tim Holtz Mini Blending Tool
Key Techniques
For background, apply selected Distress Ink color through stencil in patches onto a 3.75" square of Distress Heavystock using a blending tool. Crab Card - Tattered Rose ink with the Strings Stencil. Turtle Card - Cracked Pistachio ink with the Bubbles Stencil. Fish Card - Tumbled Glass ink with the Splash Stencil.
To finish each background, layer the second stencil over first stencil marks and apply embossing ink using the Dauber. Sprinkle with the corresponding Distress glazes and heat emboss. Crab Card - Tattered Rose and Fossilized Amber Glaze with the Mosaic Stencil. Turtle Card - Cracked Pistachio and Rustic Wilderness Glaze with the Leafy Stencil. Fish Card - Speckled Egg and Broken China with the Hearts Stencil
Apply Reinker to Media Mat or into a clean watercolor palette, pick up ink with a wet water brush and color small patches of the selected colors onto the Distress Heavystock to correspond to the various layers of your colorize dies as shown below.


3. Die-cut and assemble the Colorize die layers.
4. Die-cut the letter for each card using the Shadow Lower dies set. Again, I created my own sentiments in Microsoft Word to coordinate with my little sea cuties then print and cut it to size. I back two of the sentiments with a strip of cardstock inked in Tattered Rose for the Crab card and Broken China for the Fish card.


5. Finish cards by arranging your sea cuties, letters and sentiments and then adding a few Sizzix Sequins and beads in corresponding colors.


I hope you enjoyed this post and will give one (or more) or these cards a try!
Links are below for your shopping convenience!
See you soon Lovelies!
SUPPLIES:
I listed the products that I have used below. Please note that these are compensated affiliate links used at no cost to you. I really appreciate your support. All products were personally purchased, except the Tim Holtz Under The Sea Colorize Dies and the Sizzix Sequins and Beads and the which were received from Tim Holtz and Sizzix as part of my Designer package. Click on the icons below each product picture to shop with SimonSaysStamp.com.


Ohh my Keisha, I saw your cards come by in Tim's Live and they are all so stunning! Thank you so much for sharing, stay safe and have a wonderful Easter weekend.😍❤️