

Tim Holtz - Stamping on Fabric with the New Archival Ink Colors!
- Keisha Diann

- Mar 6, 2022
- 5 min read

Hello Lovelies! Honestly, I'm new to Archival Inks, I play with mainly water-based and pigment inks, but Archivals are solvents and a whole new world of possibilities. I was probably just as blown away as you were by some of the options Tim Holtz reviewed in his YouTube LIVE.
I hope you will explore along side me and maybe try something new. Today, we'll swatch, try the inks on different surfaces, store them and then transfer an Archival-stamped image to fabric.

Archival Inks are waterproof, fade-resistant and permanent on many surfaces. It's with this in mind that ! am using them to decorate this canvas bag. You've seen the new colors. With the addition of the 12 new selections below, this bring Tim Holt's Distress Archival ink line to a total of 24. All available at Simon Says Stamp!

Before we get to exploring, lets review today's supplies:


You'll also need your blank canvas fabric of your choice, I used a pencil case, but you can consider an apron our a tote bag etc. as alternatives. I got the set of 10 below for about $9.99.


These colors are also available in sets of four from Simon Says Stamp ($11.99) or in a bundle ($35.99).
Kit 4 - Rustic Wilderness, Fired Brick, Frayed Burlap, Prize Ribbon

Kit 5 - Crackling Campfire, Crushed Olive, Salvaged Patina, Villainous Potion

Kit 6 - Speckled Egg, Evergreen Bough, Wild Honey, Kitsch Flamingo

The are a multitude of ways to use Archival Inks with different mediums and surfaces, but for today's swatches and project, we will focus on the key supplies reviewed above or listed in the Supplies Gallery for your convenience.
Time to make the swatches!
ARCHIVAL INK SWATCHES
I almost passed on this customary step of welcoming new color to my craft room, but I am so glad that I didn't, as these inks bring their own special flavor to the Distress Ink Rainbow.
I often wonder how the colors are selected for a release but when I swatched them, I saw that they are so beautifully curated to work together.

There is something vintage about how these colors look when applied to paper. I am using my standard Neenah 110lb Solar White Cardstock here, but you should explore on the cardstock that you use most frequently. I applied the inked directly from the ink pad to thecardstock in a circular motion and then set aside to let the ink dry and settle.

Since I am new to Archival Inks, it was also important for me to see how they performed on different kinds of paper. So I chose the lightest color, to stress-test how this ink performs when stamped and the quality of the resulting image:

Let's look at those even closer, so you can truly compare, but if a perfect image is what you are looking for, there is is clear winner in my eyes! :-)


Where have you been all my life Specialty Stamping Paper???
I notice that I have not been stamping images in color quite often, but stamping in a neutral (black, white, gold etc) and often coloring them in using my water-based inks. These inks made me totally want to stamp in color and take advantage of all the detail that you can capture with the Specialty Stamping Paper.
STORING THE INKS
Featuring:

I adore custom storage and these nifty Tins designed for this ink pad size will hold the newly release bundle of 12!
I also just got a set of the reinkers, as they are the life's blood of the ink pad, they extend it's life and give you flexibility to explore the inks further. I am going to try blending...:-). Will keep you posted on how that works out.

Now for the fun part!
STAMPING ON FABRIC
Featuring:
Tim Holtz Stampers Anonymous Stamp Sets - Ponderings, Flutter, The Professor 2
Canvas Pencil Case, Bag or Tote
My title here of Stamping on Fabric is a bit misleading as we are actually going to stamp on Collage or Tissue Paper and then transfer that image to our fabric. You can stamp directly onto the fabric, but the clarity of the image will be affected by the weave of the fabric, so I am cheating by using my little helper.
PLANNING YOUR PROJECT
1.) Whatever blank canvas you choose (pencil case, tote etc.) lay out your stamps to get an idea of placement and whether they will work.
The anchoring images should be stamped in Black Soot as we are laying on the color with the 12 inks and this prevents the overall look from becoming cluttered and overwhelming.

2. Assign ink colors to the different stamps you will use:

3.) Cut a piece of Collage or Tissue Paper that mirrors the area for your stamped images.


PREPARE THE STAMPED IMAGE

Position and secure the Collage or Tissue Paper in the Stamping Tool

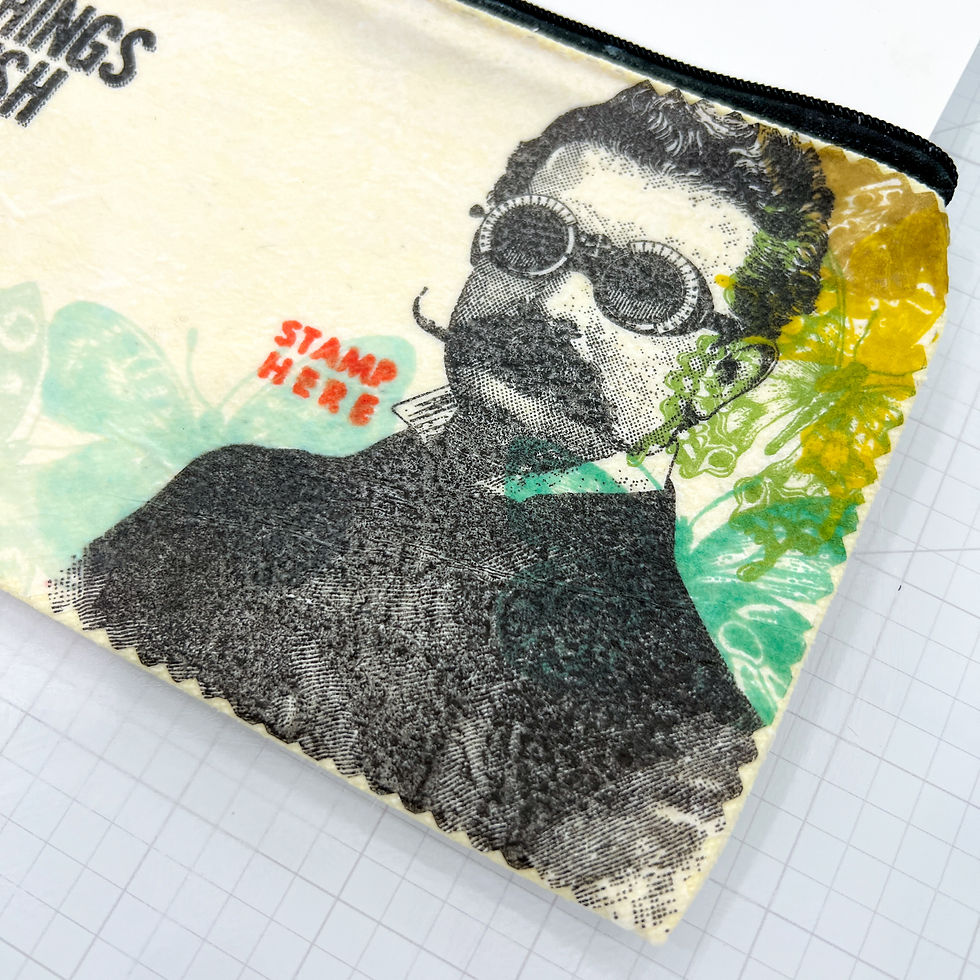
Stamp "anchor images" in Black Soot.

Stamp "Stamp Here" in Fired Brick.
Stamp the butterflies in the selected colors.


Clean up your stamps with Archival Ink Cleaner.
Completed Stamping of Collage/Tissue Paper


If you have pinking shears or the Tim Holtz Deckle Edge Trimmer, you can it to create an uneven edge around the perimeter of the collage/tissue paper.

All trimmed!
PREPARE THE FABRIC

Use the medium sized Collage Brush to apply Collage Medium Matte to the fabric, liberally and evenly.

Place the brush in water to soak until you can rinse it.

Place stamped paper over fabric on top of the wet Collage Medium Matte.

Gently and generously brush additional Collage Medium Matte over the top of the stamped paper until it adheres to the fabric.

Smooth out any ripples in the paper and ensure that the edges of the paper are fully adhered to the fabric.
Once satisfied, leave to dry.


Lovelies, I know I'll be doing this again on different fabric projects. there is something delightful about being able to create your own stamped pattern on a more durable surface like fabric.
Thank you so much for visiting! Hope to see you soon!
SUPPLIES:
I listed the products that I have used below. Please note that these are compensated affiliate links used at no cost to you. I really appreciate your support. The Archival Inks used today were part of my maker package from Tim Holtz and Ranger Ink. Click on the icons below each product picture to shop with SimonSaysStamp.com.


11111
1
1
Kaiser OTC benefits provide members with discounts on over-the-counter medications, vitamins, and health essentials, promoting better health management and cost-effective wellness solutions.
Obituaries near me help you find recent death notices, providing information about funeral services, memorials, and tributes for loved ones in your area.
is traveluro legit? Many users have had mixed experiences with the platform, so it's important to read reviews and verify deals before booking.
Hi Henriette! Sorry this took me a while but really glad that you found it helpful! I hope you share what you make. ❤️