Simon Says Stamp - Quick Ink-blending on Watercolor Print Cards
- Keisha Diann

- Jul 7, 2021
- 4 min read

Each month Simon Says Stamp releases 6 new line art designs conveniently printed on watercolor paper.
Usually I will use my watercolor paint or markers to bring the image to life. But what if you don't feel like some leisurely coloring? What if you want to make a card in a hurry? What if you and your watercolors are not getting along and have decided to see other people for a while?
In this post, we'll use use Distress Ink in some soft or bright shades and add a touch of shine with Metallic Distress Spray Stain, Foil Cardstock, Stickles and Studio Katia gems!

Particularly when you are limited on time Printed Watercolor Cards can jump start your card-making and with some quick and easy blending the focal point of your card is complete.
In addition to the above Sun and Sea Watercolor Print Cards, you will need:
Key Supplies
Simon Says Stamp Reverse Sentiment Strips
Simon Say Stamp White A2 Sidefold Cards
Distress Inks
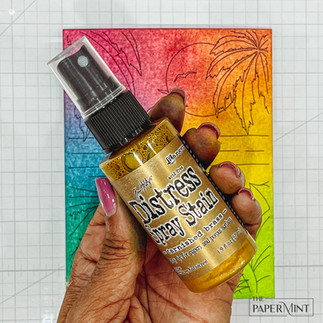
Distress Tarnished Brass Spray Stain
Ranger Stickles
Gold Foil Cardstock
Studio Katia Gems
Let's get down to the details for each card. We'll start with the card that requires a little drying time.
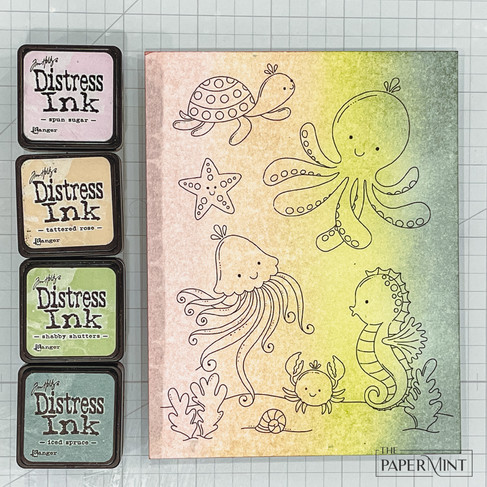
HUGS CARD - Ink-Blending Pastel Distress Inks, Embellishing with Stickles & Pearls
Size: 4 1/4" x 5 1/2"
Featuring:
Simon Says Stamp Reverse Sentiment Strips - All Things Happy
Simon Says Stamp CZ Design Hugs Die OR Simon Says Stamp Big Scripty Hugs Die
Distress Ink - Spun Sugar, Tattered Rose, Shabby Shutters and Iced Spruce
Ranger Mini Ink Blending Tool and Mini Domed Ink Blending Foams
Additional supplies linked in the Supplies Gallery at the end of this post

I am starting with this card as it requires drying time before it can be assembled. The Pre-scored card bases another time saving convenience that I adore!
Key Steps:
Create a vertical border along the left and right side of the front flap of the card base and set aside to dry
Ink-blend the four colors vertically in the following order onto the "Octopus" printed Watercolor Card
Lift some of the color from each of the "sea creature" images to lighten them relative to the background by running a wet brush over them and dabbing off the color onto a rag or piece of paper towel. You can see more about this technique in this post
You can also further lighten each of the sea creatures by dabbing some white pigment ink onto your craft mat and and using that to paint each image with your water brush
Add little touches of Stickles Glitter Glue in the highlight areas thoughout the image and set aside to dry
Trim dry ink-blended card front to 4" x 5 1/2". Prepare the Hugs diecut and Sentiment Strip and adhere to the card front. Adhere the card front to the dry card base with foam tape
Adhere pearls with Bearly Craft Glue to card front
Steps 4 and 5:
Steps 6 and 7:


SENDING SMILES CARD - Ink-Blending Bright Distress Inks, Embellishing with Pearls and Flower Sequins
Size: 4 1/4" x 5 1/2"
Featuring:
Distress Ink - Shaded Lilac, Seedless Preserves, Victorian Velvet, Dried Marigold, Spiced Marmalade, Squeezed Lemonade, Crushed Olive and Pine Needles
Ranger Mini Ink Blending Tool and Mini Domed Ink Blending Foams
Studio Katia - Radiant Orchid Pearls, Flower Sequins
Additional supplies linked in the Supplies Gallery at the end of this post

Key Steps:
Ink-blend the eight colors horizontally in the following order onto the "Pineapple" printed Watercolor Card: Shaded Lilac, Seedless Preserves, Victorian Velvet, Dried Marigold, Spiced Marmalade, Squeezed Lemonade, Crushed Olive and Pine Needles
Trim dry ink-blended card front to 4" x 5 1/4"
Prepare the Sending Smiles diecut and Sentiment Strip and adhere to the card front. Adhere the card front to the dry card base with foam tape
Adhere pearls and sequins with Bearly Craft Glue to card front
Step 1:

Steps 3 and 4;

All done!

THANK YOU CARD - Ink-Blending A Distress Ink Rainbow, Embellishing with Gold Foil Diecut, Metallic Distress Spray Splatters and Gold Gems
Size: 4 1/4" x 5 1/2"
Featuring:
Simon Says Stamp Reverse Sentiment Strips - All Things Happy
Distress Ink - Picked Raspberry, Mustard Seed, Twisted Citron and Salty Ocean
Ranger Mini Ink Blending Tool and Mini Domed Ink Blending Foams
Additional supplies linked in the Supplies Gallery at the end of this post

Key Steps:
Ink-blend the eight colors horizontally in the following order onto the "Pineapple" printed Watercolor Card: Picked Raspberry, Mustard Seed, Twisted Citron and Salty Ocean
Splatter with Tarnished Brass Distress Ink Spray Stain
Trim dry ink-blended card front to 4" x 5 1/4"
Prepare the Sending Smiles diecut and Sentiment Strip and adhere to the card front. Adhere the card front to the dry card base with foam tape
Adhere pearls and sequins with Bearly Craft Glue to card front
Step 1:

Step 2:
Steps 4 and 5:


Let me know in the comments which card is your favorite today.
Full supply list below for your shopping convenience.
See you soon Lovelies!
SUPPLIES:
I listed the products that I have used below. Please note that these are compensated affiliate links used at no cost to you. I really appreciate your support. Simon Says Stamps Rainbow Release products were provided as part of my Design Team package. Click on the icons below each product picture to shop with SimonSaysStamp.com.


Beautiful cards Keisha. These printed cards are definitely useful if you don't have much time and your way of colouring makes it even more quicker to make something beautiful. And although I'm a bright colour girl my favorite card is the soft coloured one with the cute sea annimals. Thank you so much for sharing, stay safe and have a wonderful day.