

Simon Say Stamp - Flower Frenzy Negative/Positive Inking Cards
- Keisha Diann

- Apr 23, 2022
- 3 min read

Hello Lovelies! Today I have a pair of Spring cards that were rainbow inked to showcase the floral pattern - one coloring the actual flowers, the other coloring the space between the flowers.
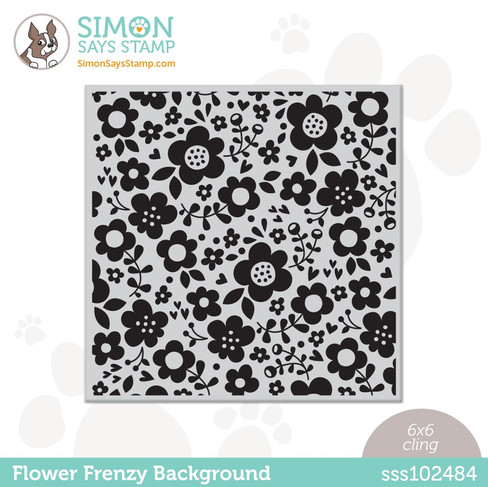
I love solid image patterns like the one on the Flower Frenzy Background Stamp where you can really color the image with ink (positive inking) or use it to create a mask for you to ink between the pattern (negative inking)! I paired this fun stamp with a couple other new friends from Simon Says Stamp's Happy and Joyful release to make today's cards.
Positive Inking

Negative Inking

Of course, I took my gorgeous, candy color Simon Says Stamp Pawsitively Saturated Inks and Blending Brushes along for this ride, but here's a quick look the key supplies for this pair:
Essential Card Supplies:


Click here to view the full supply list or check out the one linked in the gallery at the bottom of this post when you have finished exploring these cards.
Today's GIF!
Why ??? Because I love flowers AND rainbows!
YOU ARE SO LOVED CARD - Inking and Die-cutting
Patterned Layer: 3 3/8" x 4 1/8"
Card Base: 4 1/4" x 5 1/2"
Featuring:
Simon Says Stamp Premium Die Ink Pad - Smoke
Simon Says Stamp Pawsitively Saturated Ink Pad - Sweets, Mandarin, Sunbeam, Sprout, Tropic

For this card, just apply the ink one color at a time to the stamp and then press onto the white cardstock to leave an impression of the color before applying the next color of the ink. It's ok to be messy and imprecise as you overlap the colors, it looks more organic and appealing!
CARD WALKTHROUGH

Ink each color individually and stamp.

At first I was going to use the scalloped die shown for different card design, but I change my mind and diecut the rainbow floral panel again with 2 heart dies.

Die-cut the largest rectangle in the A2 Marquee Set out of white cardstock.
Adhere a layer of white cardstock stamped with the Lined Background in Stone Ink.

Adhere the floral rainbow hearts as shown.
Cut and adhere the "You are so loved" Reverse Little One Sentiment Strip

Adhere and tuck the heart sequins and under and over the Sentiment Strip.

I like the contrast of the bright messy pattern against the sedate, grey background...

Simple and pretty!

HAPPY AND JOYFUL CARD - Wet Embossing, Ink-blending and Die-cutting
Patterned Layer: 3 1/4" x 4"
Card Base: 4 1/4" x 5 1/2"
Featuring:
Simon Says Stamp Premium Die Ink Pad - Intense Black
Simon Says Stamp Pawsitively Saturated Ink Pad - Sweets, Sunbeam, Tropic
For this card, we are embossing the floral pattern for an embossed-resist effect when the ink is applied with a blending brush
CARD WALKTHROUGH

Emboss the Flower Frenzy pattern using Clear Ink and Clear Embossing Powder on a 3 1/4" x 4" piece of white cardstock.
I started with a larger size that I cut down, but I think it will be easier for you to start with the intended size.

Lay out your inks and brushes so you are ready to blend.

Start with the Sweets Ink, applying generously toward the bottom right and then fading just a little bit.

Overlap the Sunbeam Ink with the Sweets Ink to get a pretty orange color before fading into yellow.

Rinse and repeat with the Tropic Ink until the whole panel is covered as shown.

Stamp the Stacked Greetings sentiment directly onto the card base.
Pop up the floral panel with foam tape and adhere to the left of the sentiment.

Die-cut and adhere the Etched Berry Branch out of white cardstock and vellum as shown.

A little bit of Spring pretty to wish your special someone Happy Birthday!

Lovelies, rainbows are delightful, but it would also be fun to try more funky color schemes for your pair of positive/negative inking cards!
Thank you for stopping by and see you soon!
SUPPLIES:
I listed the products that I have used below. Please note that these are compensated affiliate links used at no cost to you. I really appreciate your support. All stamps used today were part of my maker package from Simon Says Stamp. Click on the icons below each product picture to shop with SimonSaysStamp.com.


Although both cards are beautiful, I have a favorite. The card with the two hearts has stole my heart, so awesome, just like your GIF from this post. Thank you so much for sharing these beautiful inspirations Keisha, stay safe and have a wonderful weekend.
I love your bright, cheery cards.