

Celebrate STAMPtember® with Vibrant New Ink Colors and Make an Embossed Boho Flowers Birthday Card
- Keisha Diann

- Sep 1, 2025
- 2 min read

Hello Lovelies! This is my favorite crafting month as STAMPtember® 2025 is here from Simon Says Stamp. During STAMPtember®, in addition to a blockbuster main release of crafting goodies, we're going to get exclusive releases on many days from some of our favorite brands.
Speaking of the main release... I can never resist new ink colors, so we are kicking off STAMPtember® with swatches and an HBD card. Today's card is super easy as we are ink-blending, then embossing with the new Boho Flowers folder, and finishing with tinting the Happy Birthday die-cut with our new inks.

Key Supplies for the Embossed Boho Flowers Birthday Card!


Get Your Supplies!
Click on the image below to SHOP THE STAMPtember® RELEASE! OR
SHOP the Supplies section at the bottom of this post.

Today's GIF!
I'll take 2 of these please!
Like this card and my CORNY GIFs? CLICK BUTTON BELOW
to sign up for blog updates:
BOHO FLOWERS BIRTHDAY CARD - Embossing, Ink-Blending, Die-cutting, Tinting and Highlighting Effects
Card Size: 4 1/4" x 5 1/2"
Embossed Layer: 4" x 5 1/4"

COLOR PALETTE
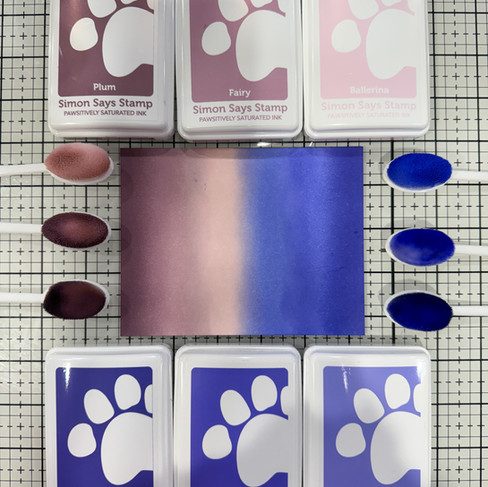
I make very simple tag swatches for ALL my inks, which I use every time I craft to choose colors. Even though I planned to use all the new ink colors in today's ombre card, the swatches helped me figure out what order to apply the inks in.
With oodles of inks in Simon Says Stamp's Pawsitively Saturated Ink line, swatches are a must for making future selections and buiding color palettes for other projects
Pawsitively Saturated Inks
Trio 34 - Ballerina, Fairy, Plum
Trio 33 - Periwinkle, Clematis, Crocus
MY SWATCHES
Trio 34 - Ballerina, Fairy, Plum


Trio 33 - Periwinkle, Clematis, Crocus


SWATCH/CARD TIPS
Swatch Tag
The die I use to make all my swatches is retired, so I going to recommend a couple of faves for you to consider.
Swipe the inkpad across the tag several times and let dry to achieve even color or apply with a clean blending brush.
Card
Spritz the back of the ink-blended gradient cardstock layer with water - this will enhance the embossed impression without cracking the paper.
Overlap your inks when blending with a brush for smooth gradients
To highlight the embossing:
Hold the white pigment inkpad horizontal and parallel to the embossed design and lightly wipe across the raised surface.
Let the first layer or the white ink dry and apply a second layer to increase the opacity of the white ink.
CREATING THE INK-BLENDED, EMBOSSED & HIGHLIGHTED CARD FRONT


CREATING THE TINTED SENTIMENT


UP CLOSE AND CRAFTY


LAST LOOK

Thanks for stopping by today! Drop me a comment and say hi!
SUPPLIES:
I listed the products that I have used below. Please note that these are compensated affiliate links, used at no cost to you. I really appreciate your support. All stamps used today were part of my STAMPtember® 2025 maker package from Simon Says Stamp. Click on the icons below each product picture to shop with SimonSaysStamp.com.


Mình có lần lướt đọc mấy trao đổi trên mạng شيخ روحاني thì thấy nhắc nên cũng tò mò mở ra xem thử cho biết. Mình không tìm hiểu sâu جلب الحبيب chỉ xem qua trong thời gian ngắn để quan sát bố cục جلب الحبيب cách sắp xếp شيخ روحاني các mục và trình bày nội شيخ روحاني dung tổng thể. Cảm giác là các phần được trình bày khá gọn, các Berlinintim mục rõ ràng nên đọc lướt cũng không bị rối Berlinintim, với mình như شيخ روحاني vậy là đủ để nắm tin cơ bản rồi. جلب الحبيب
,
Micro link extension hair is perfect for adding vibrant, colorful styles for a Boho-themed birthday! You can mix shades to create a playful, embossed flower effect in your hair. It’s low-damage, versatile, and lets you celebrate with unique textures and lively colors that match the festive vibe
أفضل خدمات تنظيف الكنب والسجاد والستائر والمراتب في الفجيرة
يبحث الكثير من سكان الفجيرة عن خدمات تنظيف احترافية تعيد لمنازلهم البريق وتمنح المفروشات مظهرًا جديدًا ومنعشًا. فمع مرور الوقت، تتراكم الأتربة والبقع على الكنب والسجاد والمراتب والستائر، مما يجعل تنظيفها بالطرق التقليدية أمرًا صعبًا وغير فعّال. وهنا تأتي أهمية الاعتماد على شركات متخصصة تمتلك الأجهزة والمواد المناسبة لكل نوع من الأقمشة.
أول ما يجب الاهتمام به هو تنظيف كنب في الفجيرة، حيث يعتمد الخبراء على أجهزة البخار القادرة على إزالة الأوساخ العميقة والبقع المستعصية دون التأثير على نسيج الكنب أو ألوانه. هذه الخدمة ضرورية للحفاظ على نظافة المنزل وصحة الأسرة، خاصةً مع الاستخدام اليومي المكثف للأثاث.
كما أن العناية بالسجاد لا تقل أهمية، فهو الجزء الأكثر تعرضًا للأتربة والبقع. تقدم خدمة…
Celebrate STAMPtember® with stunning new ink shades that brighten any card design, especially the embossed Boho Flowers birthday card—it’s full of charm and creativity. Just like how crafting needs focus and patience, sometimes people prefer to hire someone to take my pmp exam, easing stress while still reaching their goals.
Wow, this embossed boho‑flower birthday card is absolutely stunning! I love how the textures and colors come together in such an elegant design. As someone who works in academic consulting—especially providing Master Thesis Help—I often see parallels between crafting a beautiful card and shaping a polished thesis. Both need structure, layering, and attention to detail. If any of you ever feel like your thesis lacks that “wow factor,” feel free to reach out—I’d be happy to share tips or feedback!